


Hello everyone,
It has probably been the longest time without me writing anything new, so I apologize for the lack of updates. This post has lots of information, so please I kindly ask you to be patient.
Back at the beginning of August I decided to take a short break to build a model, it was meant to be a B737-700, unfortunately, things were getting a bit complex with the model and so I switched back to work for fear of spending too much time on this model.
However, I may continue with this build in the future and to me it has already been worth it because I have learned a lot thanks to my friend Gustavo whom has given me lots of tips, also, an issue I had with the cockpit windows has given me a final solution to the clear parts, more on that later.
So what has been going on? A lot. I have been updating molds for ease of production (they are still the same parts) and less waste of time with a big reduction of dust that I used to deal with while preparing those models, so it is safer for me now.
Here are the newest projects that I’ve been working on for the past weeks:
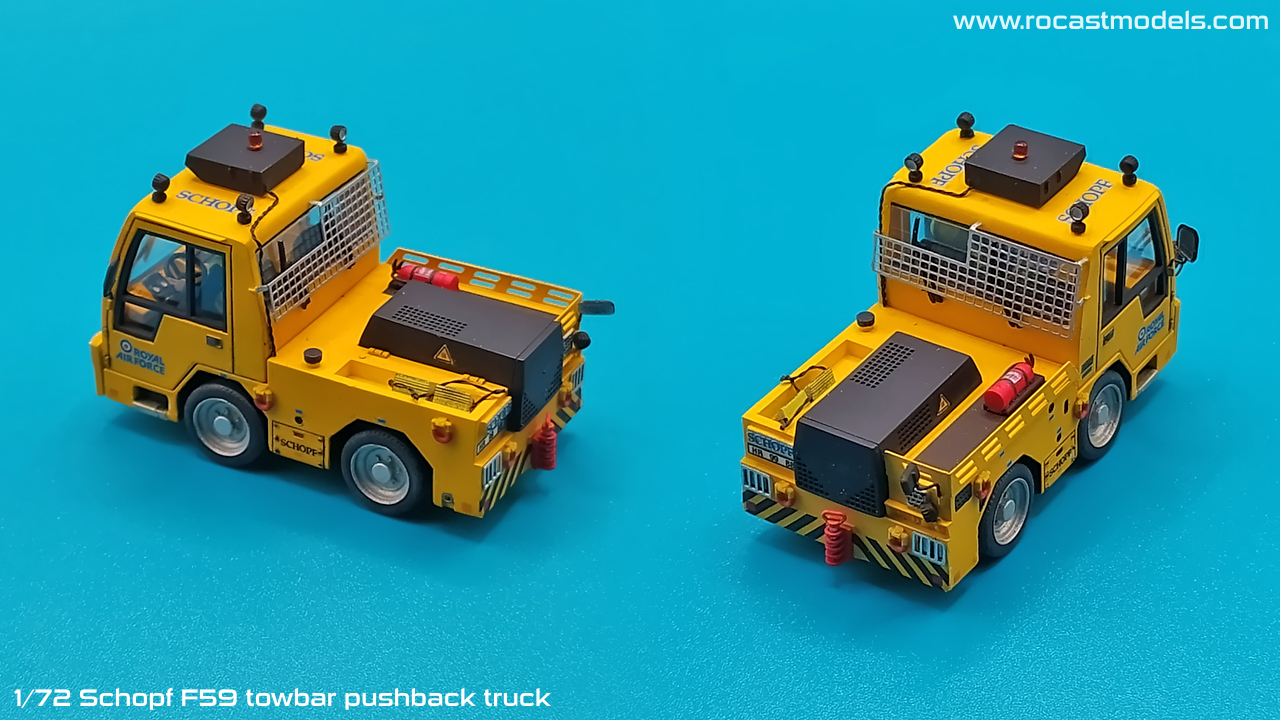
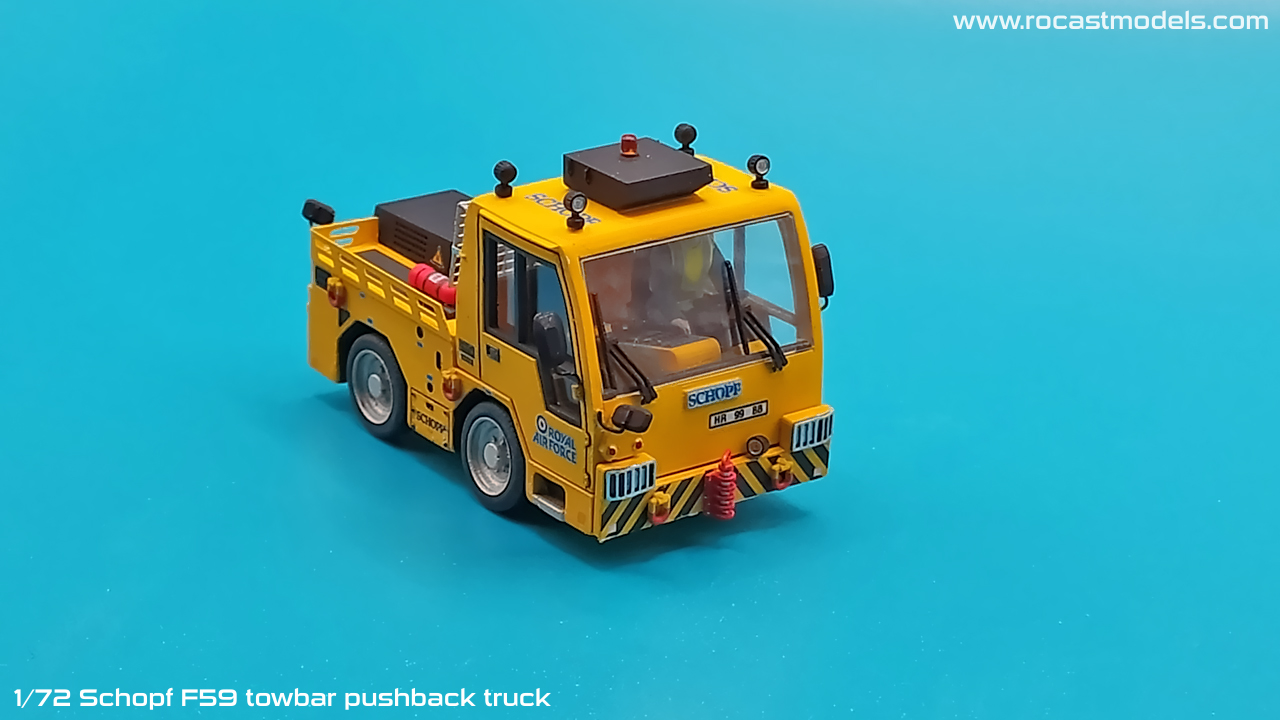
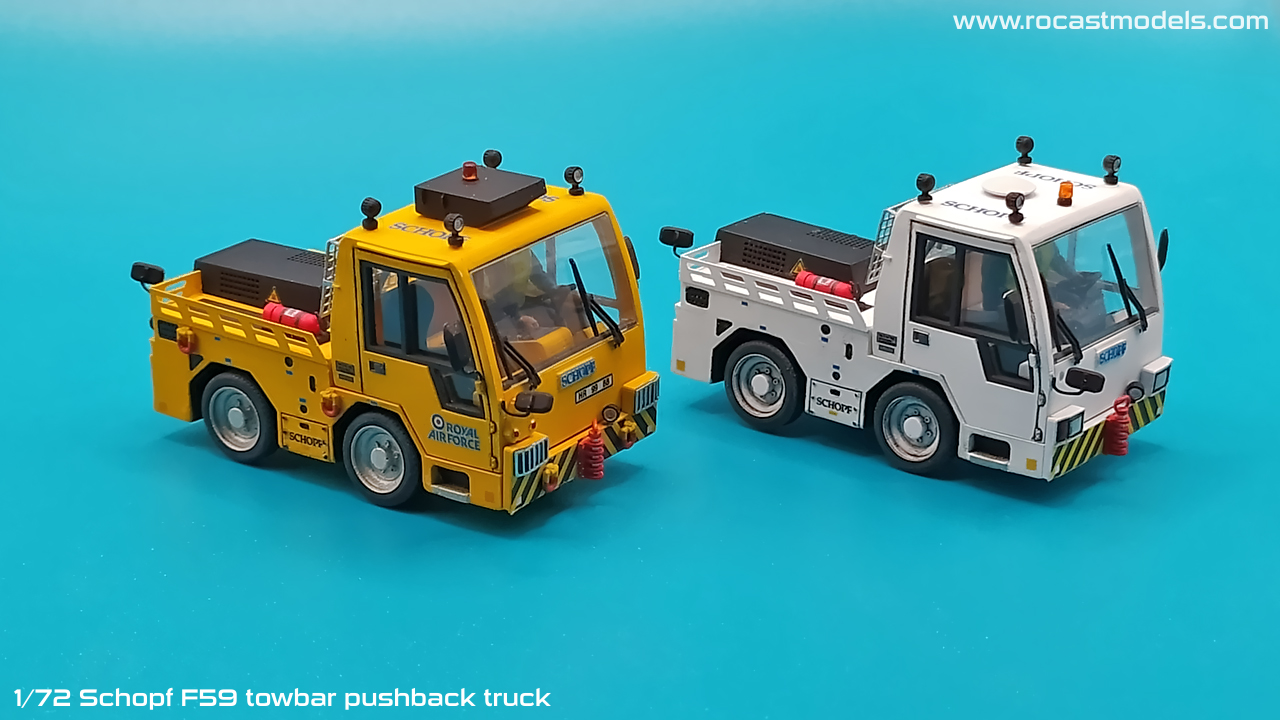
- Schopf F59 in 1/72 scale:
I have been finishing the Schopf F59 in 1/72 scale, something that was requested to me, which I thought would be just a “scale up” model, it turned out to be a completely and remodeled new project, but finally, here it is:
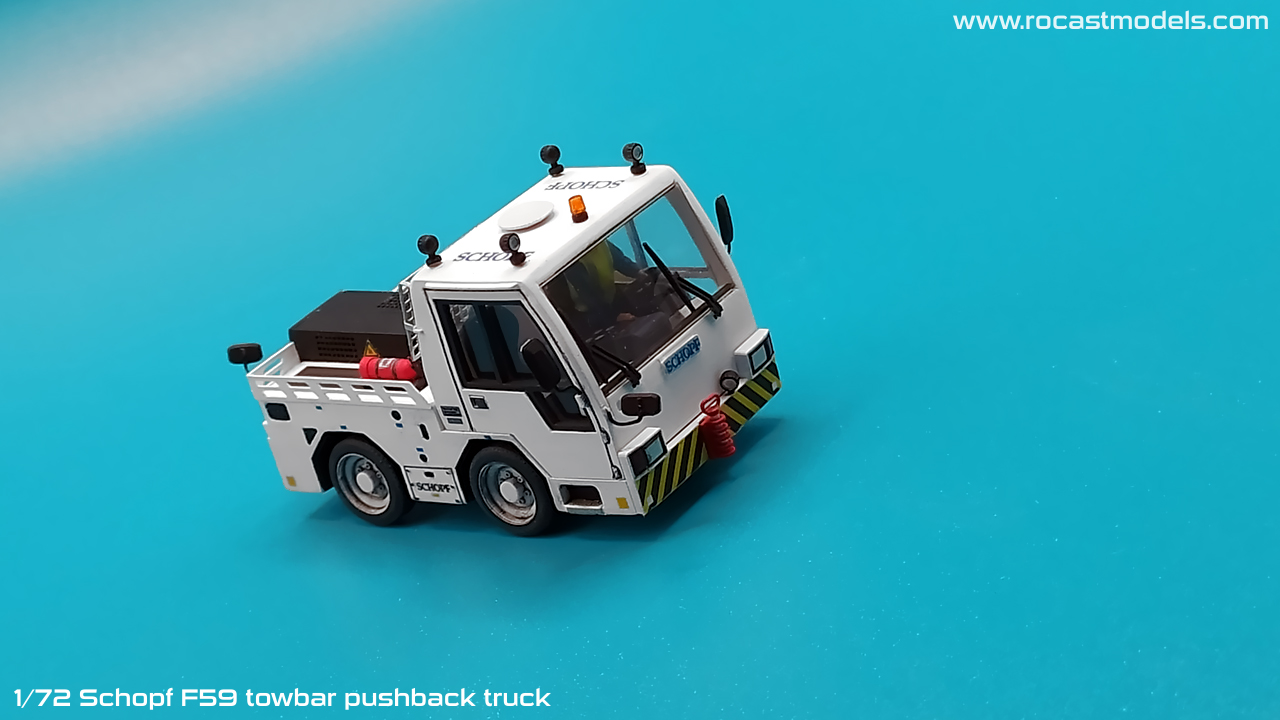
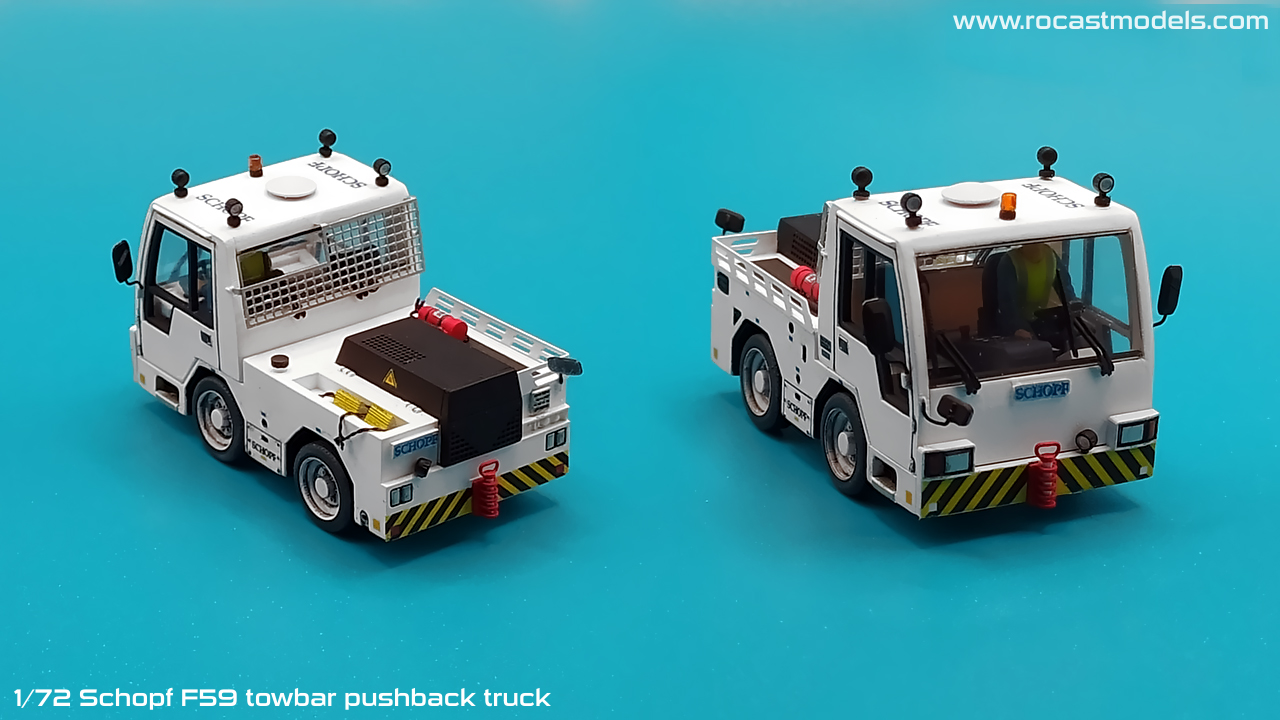
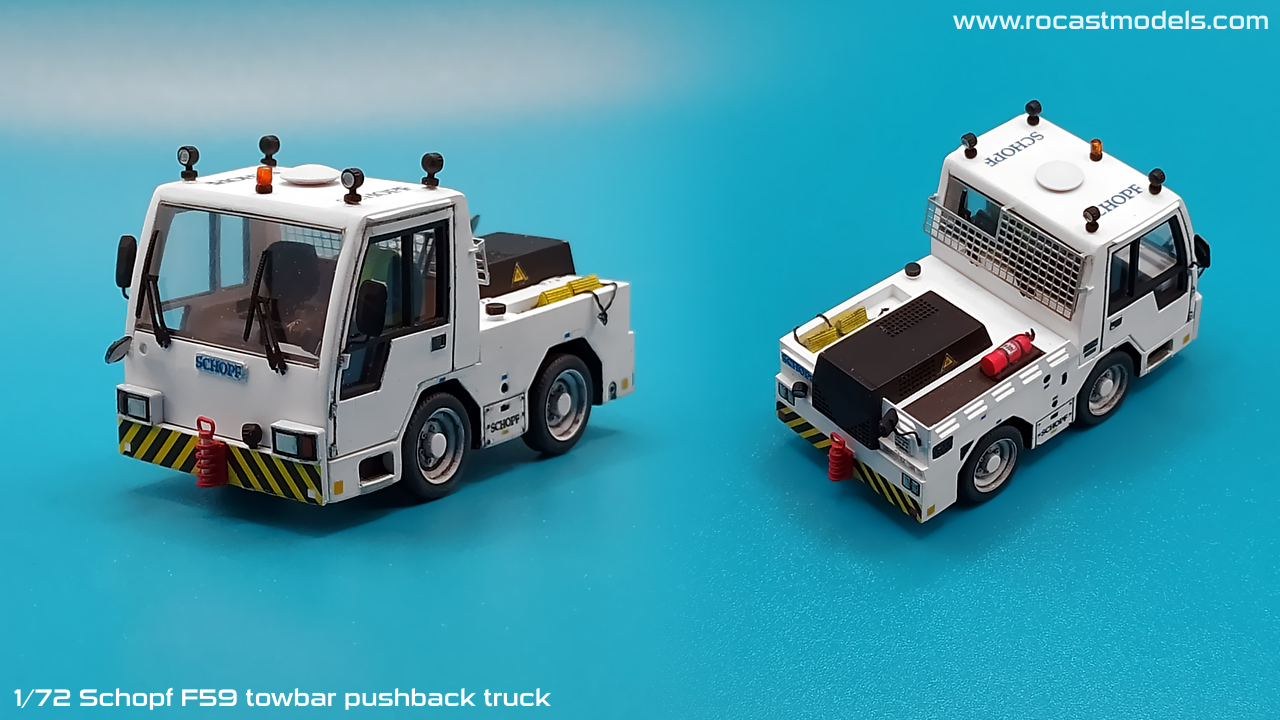
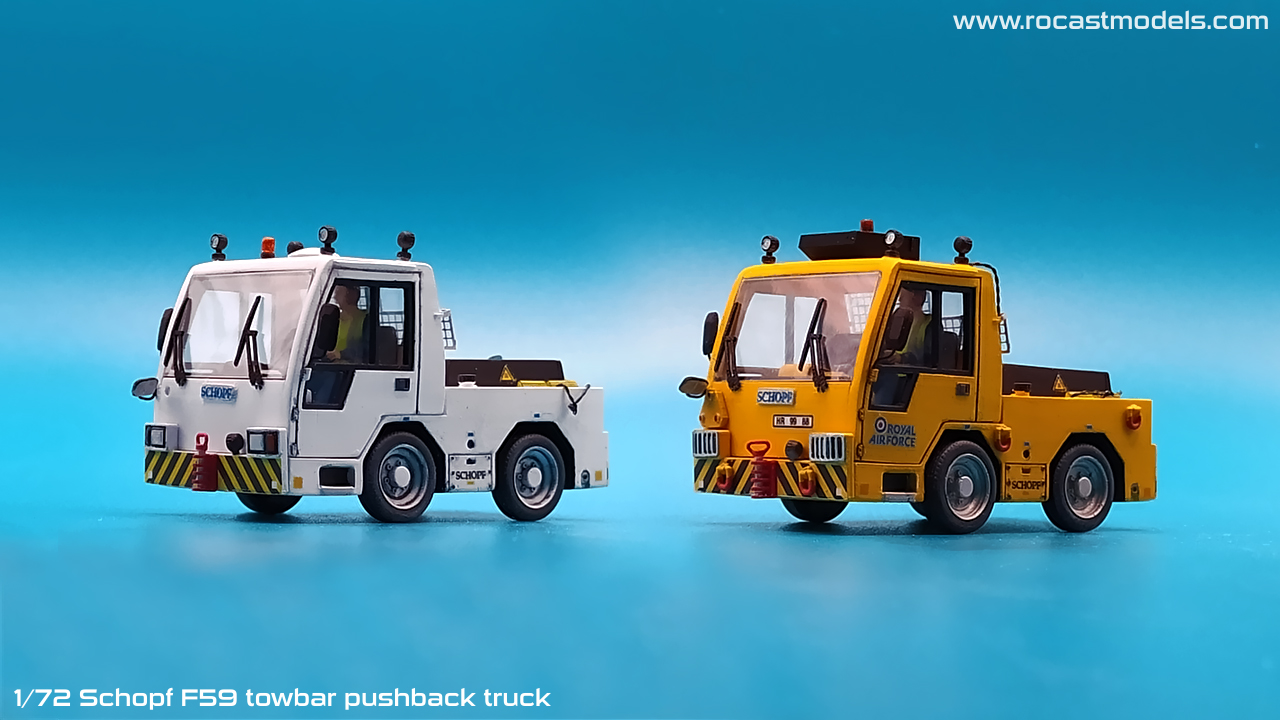
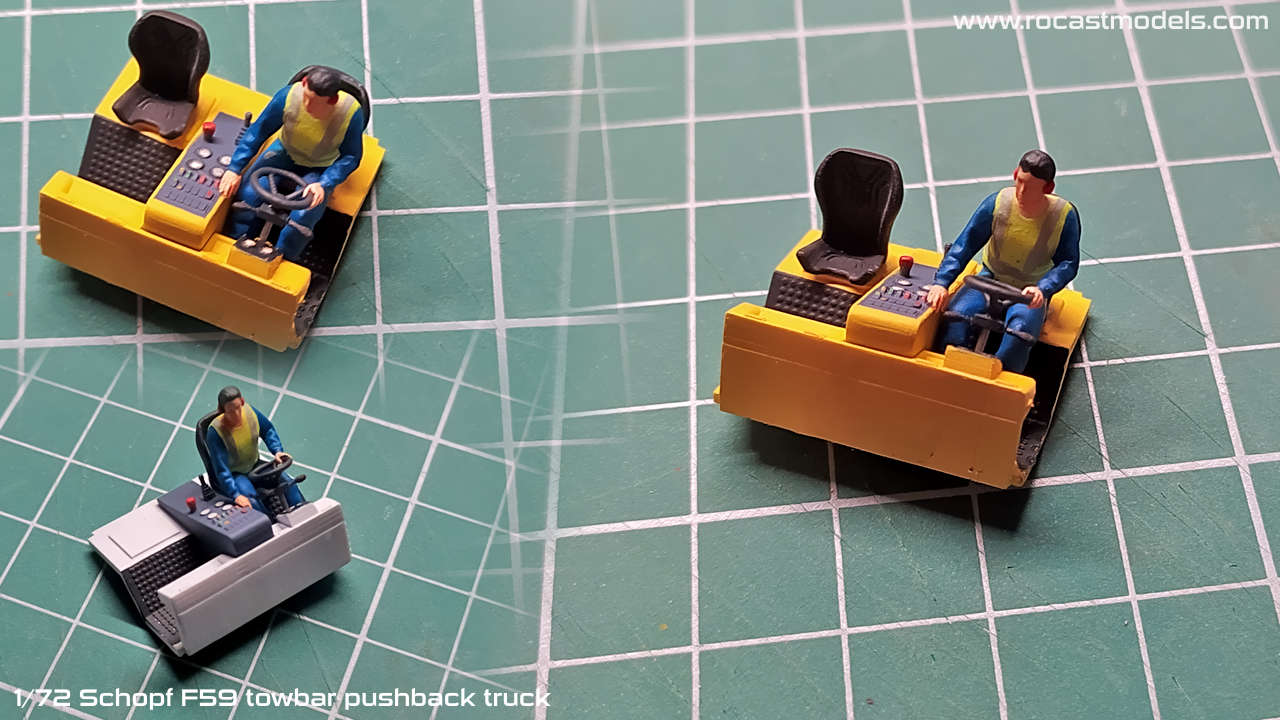
This model kit will include resin parts, photo etched parts, a clear resin part for the beacon lights, acetate windows, wires and decals of which a part of them are also for the RAF livery. The model features two different types of airbox, civil/militar, as well as shackles and the photo etch includes the rear windshield grid as well as the grid for the headlights and tail lights. Driver figure is also included.

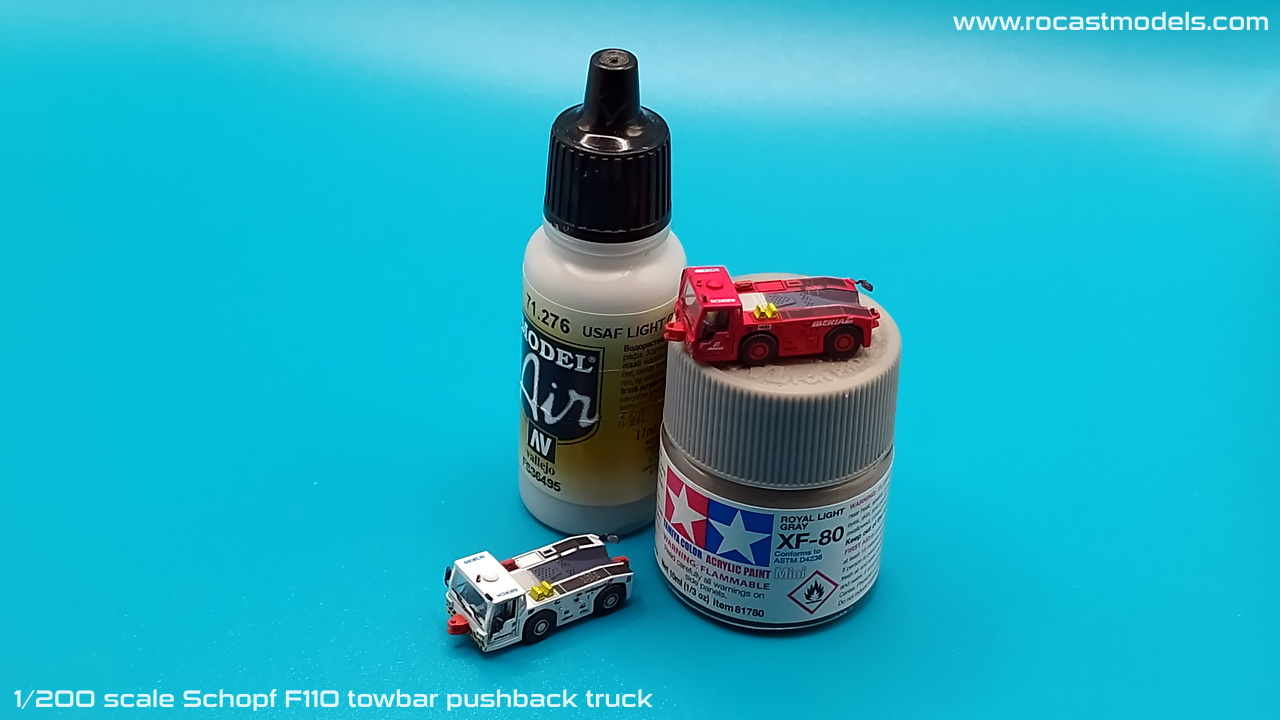
Here is a comparison of size between the models and a couple of paint bottles.
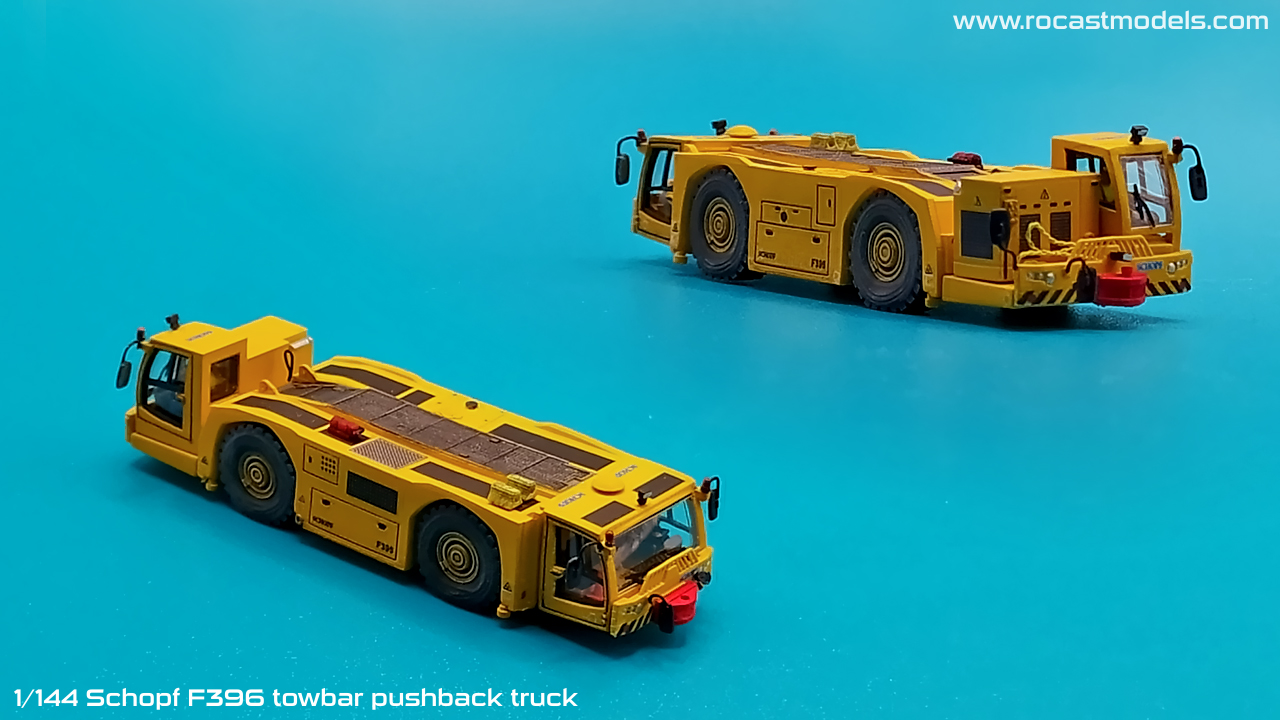
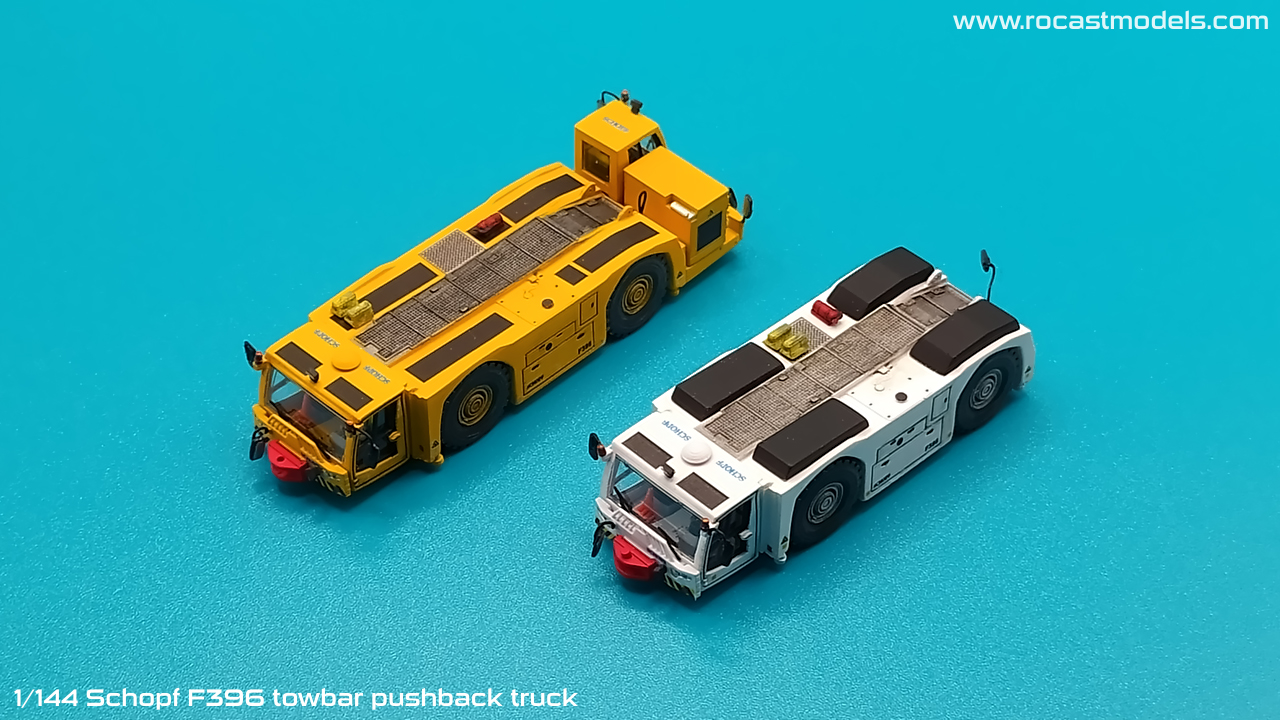
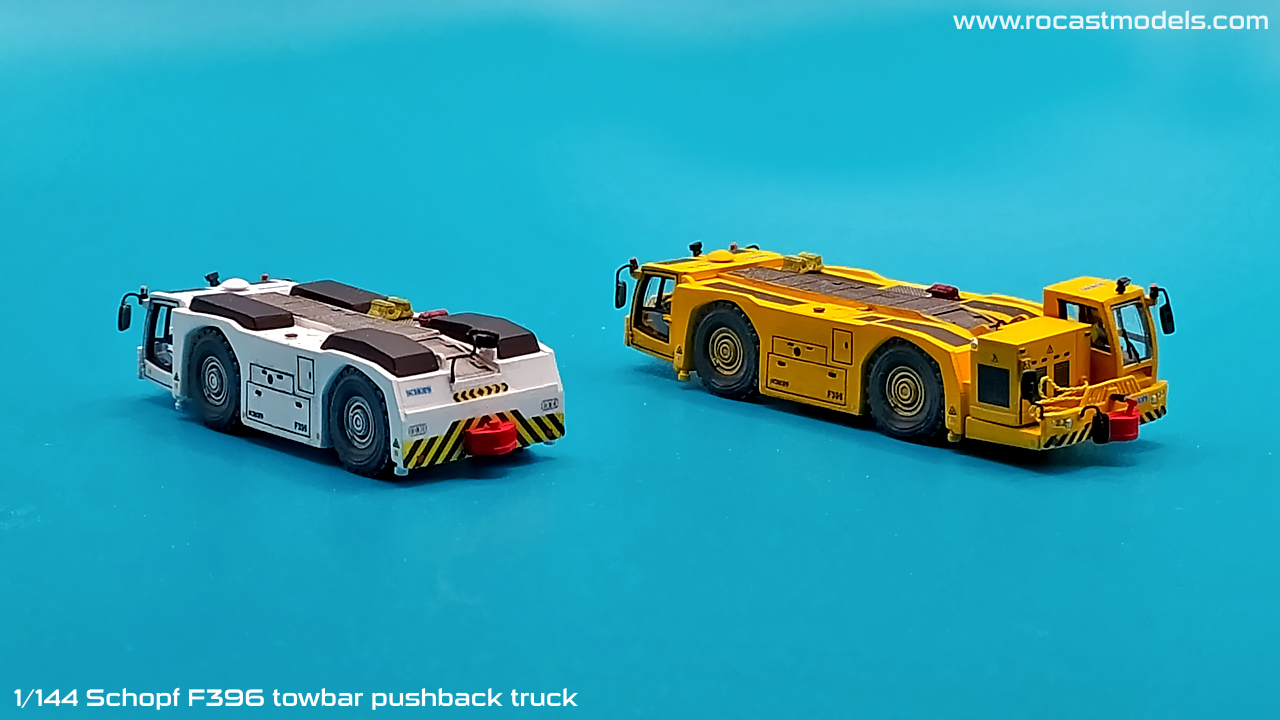
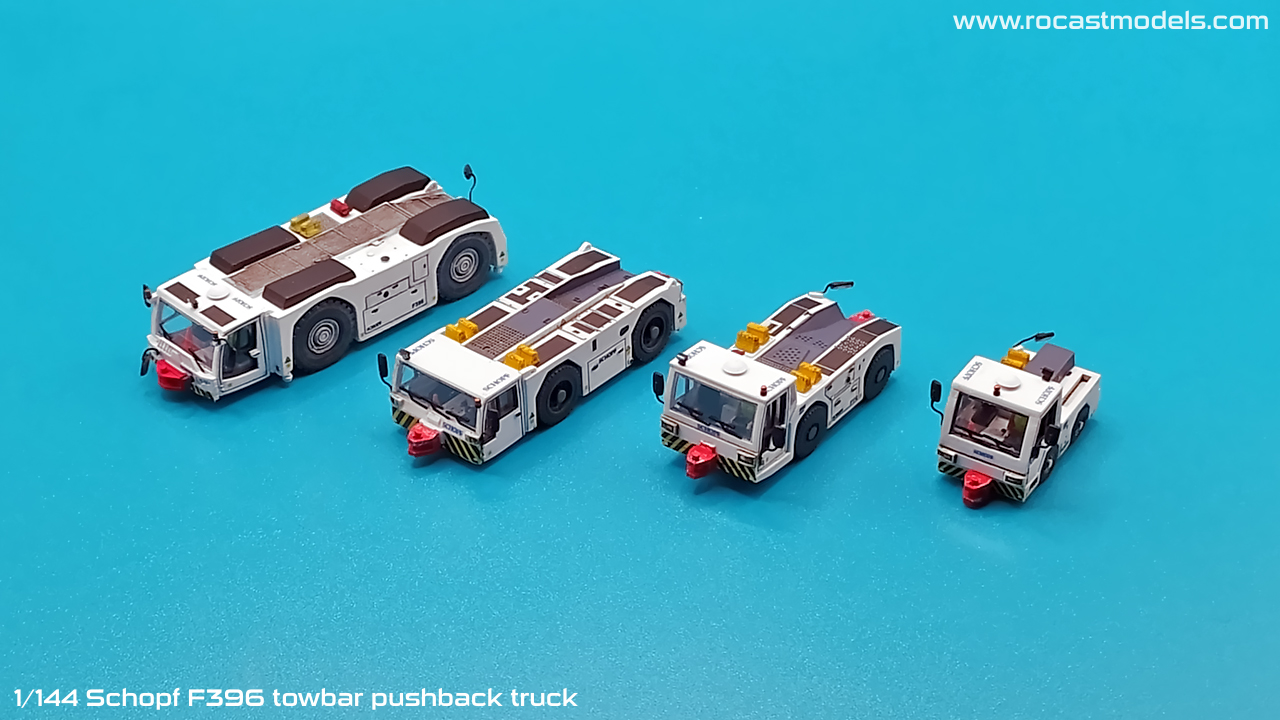
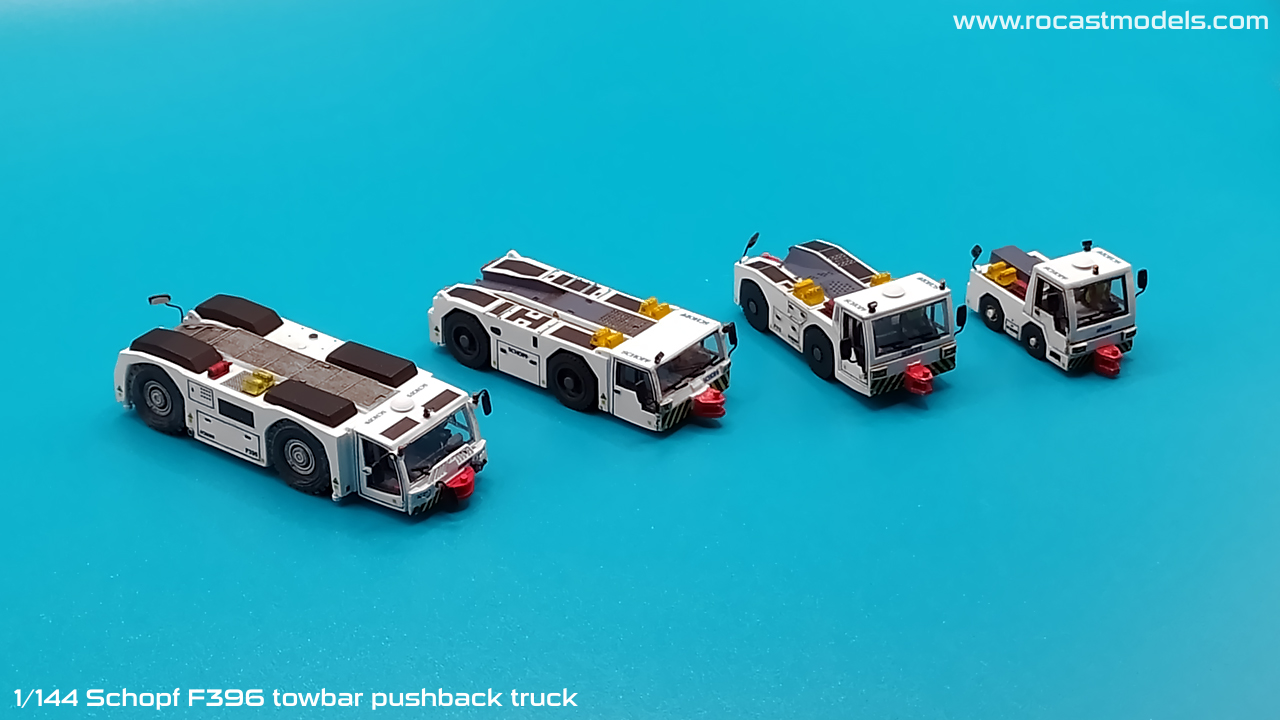
- 1/144 Schopf F396:
I have been working with this model for a very long time. It was nearly finished production but I never got the chance to actually build an example model and make the proper initial stock units of it.
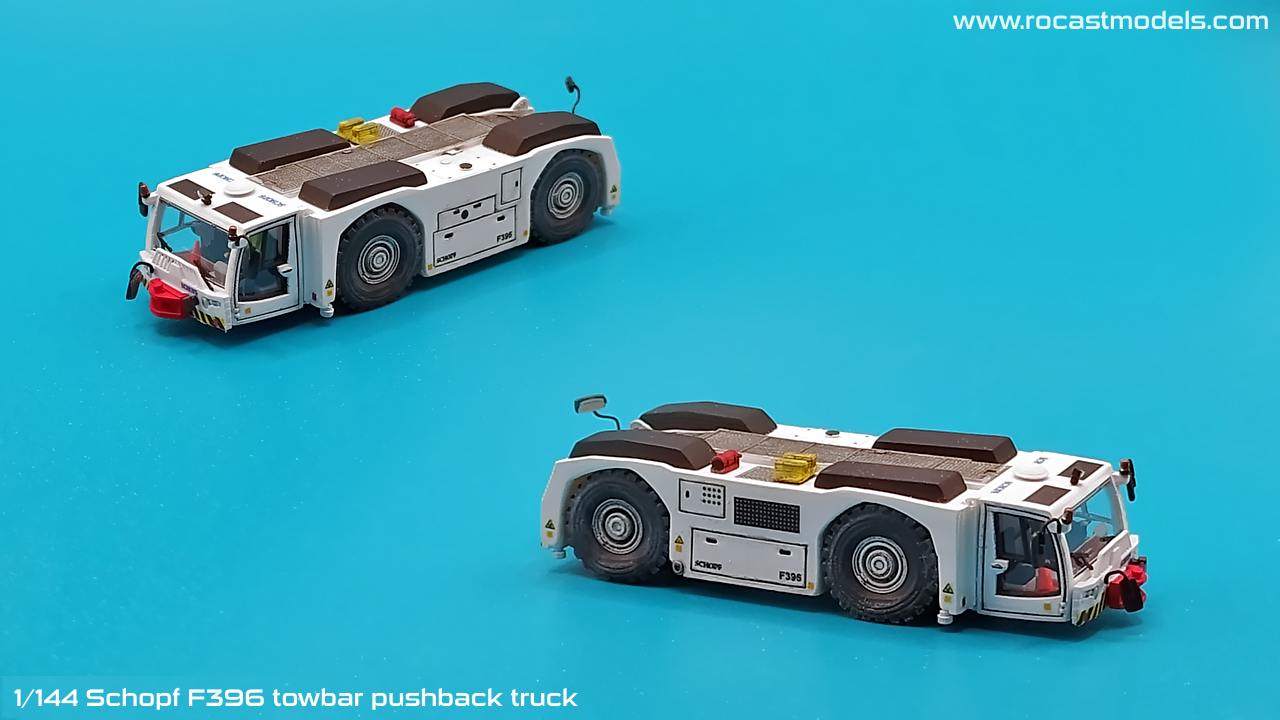
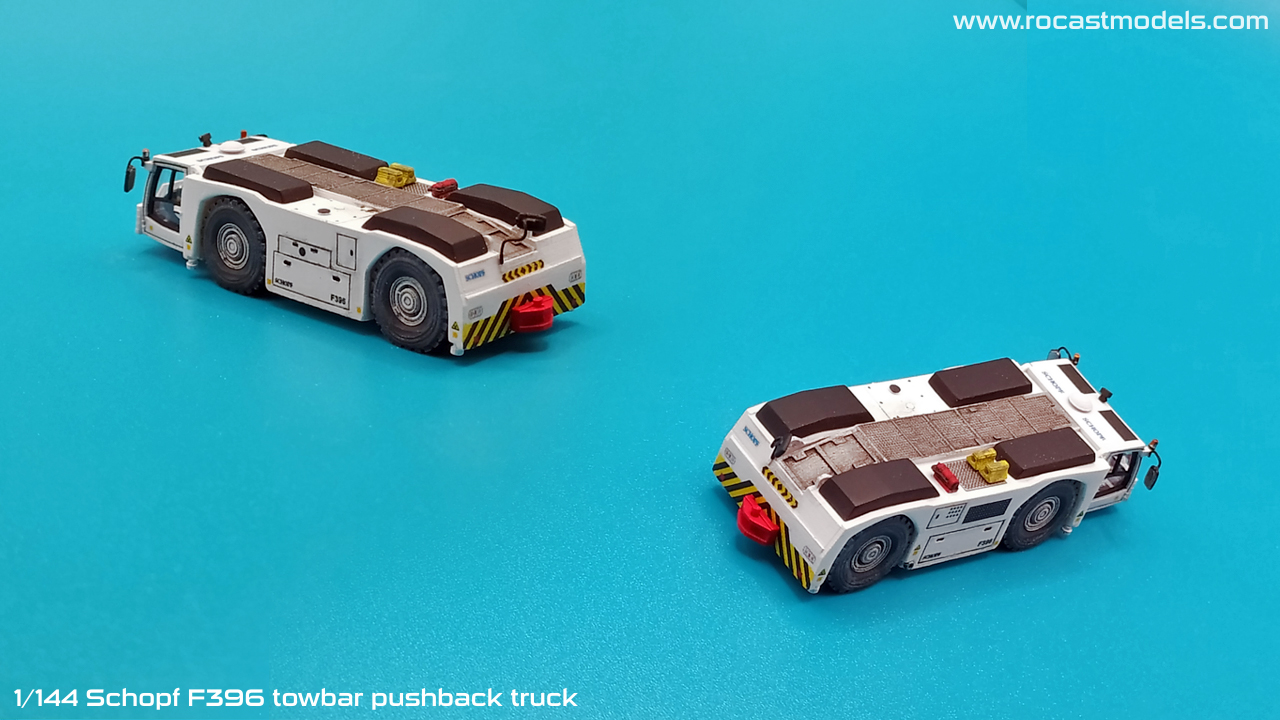
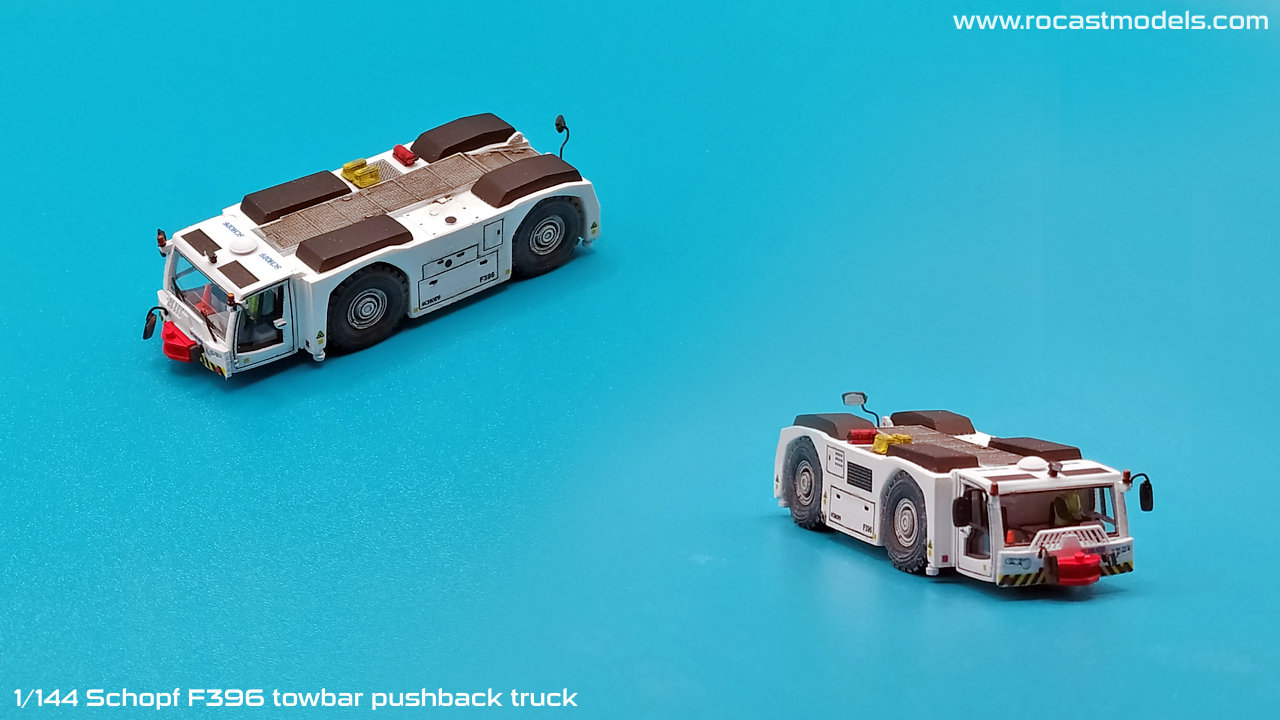
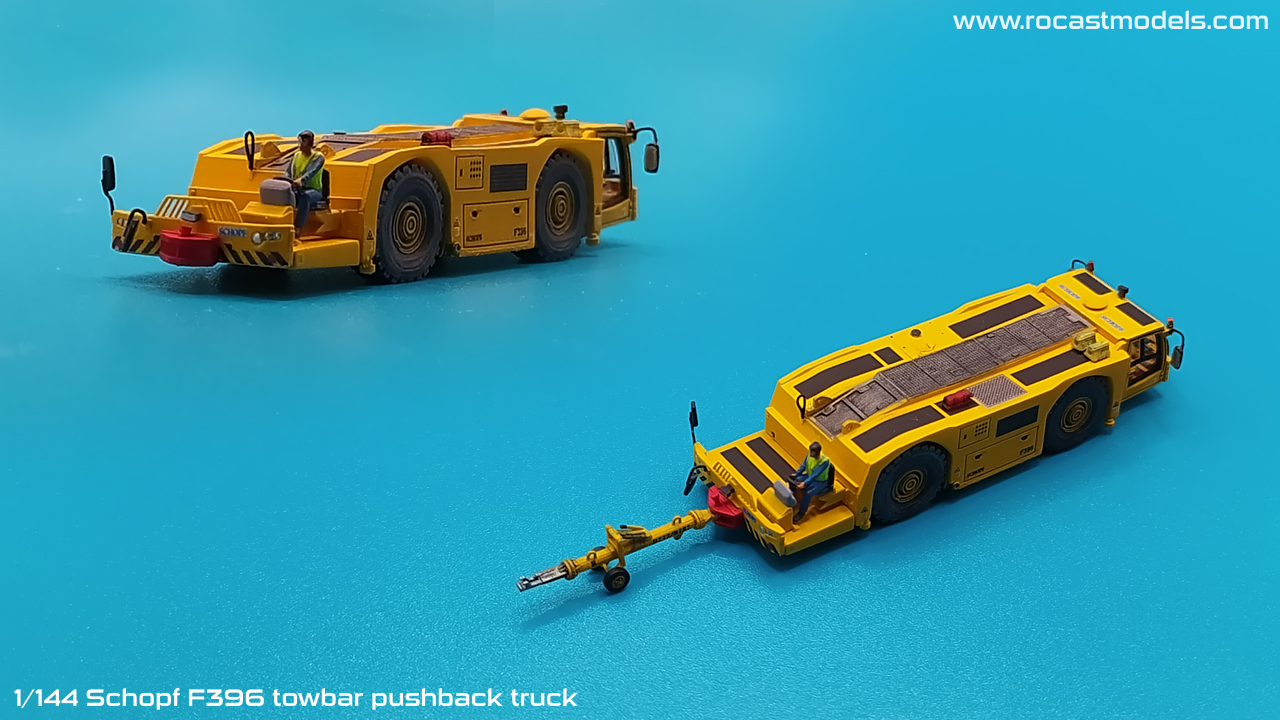
This model, as you can see from the photos below, is quite special because you can build it with a rear platform, just like the real model. This F396 truck is the biggest of the Schopf family and some of them are built with a rear platform which can include cabin and GPU.
In this case, the kit is ready to have all of these options, so you can build it however you like. Some of them have the body covers as featured in the photos above, and some of them simply don’t.
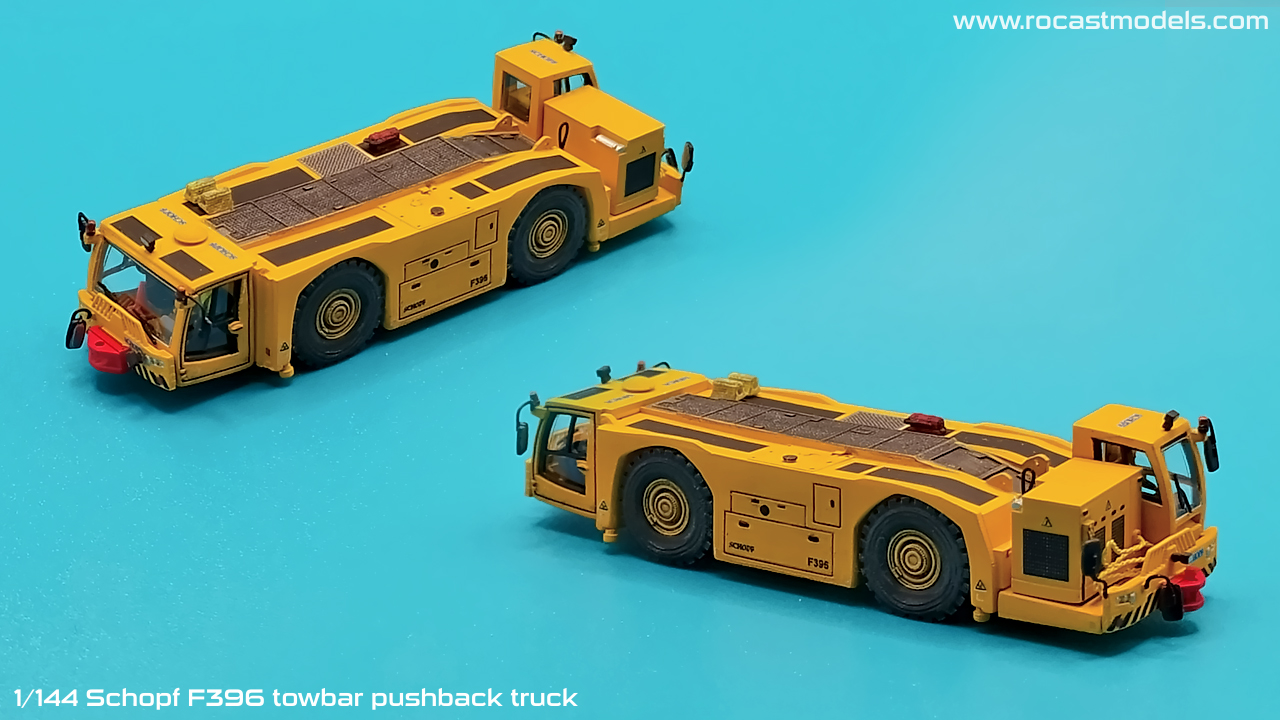
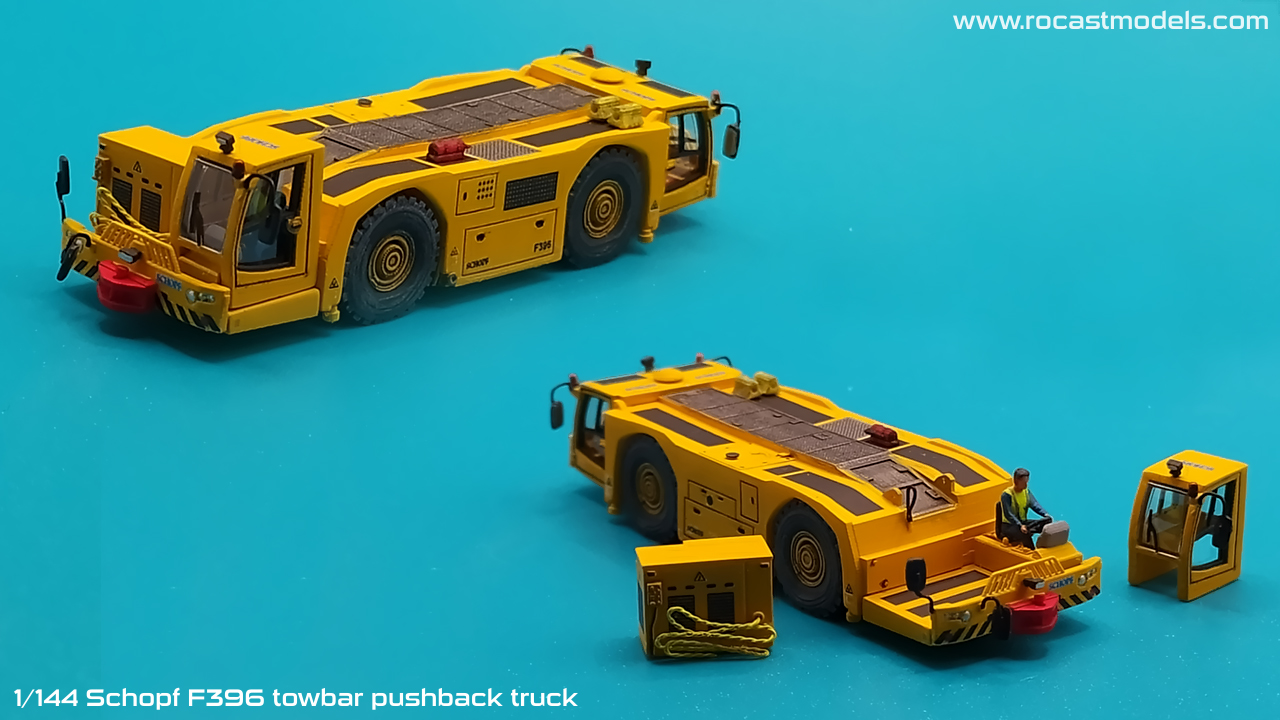
This kit, similar to the previous Schopf pushbacks also include photo etch for the wipers as well as braided wire for the GPU and two figures and the needed decals for a base/generic model.
If you already own any of the previous Schopf pushback trucks, you can compare the size of the F396 from the photos below:
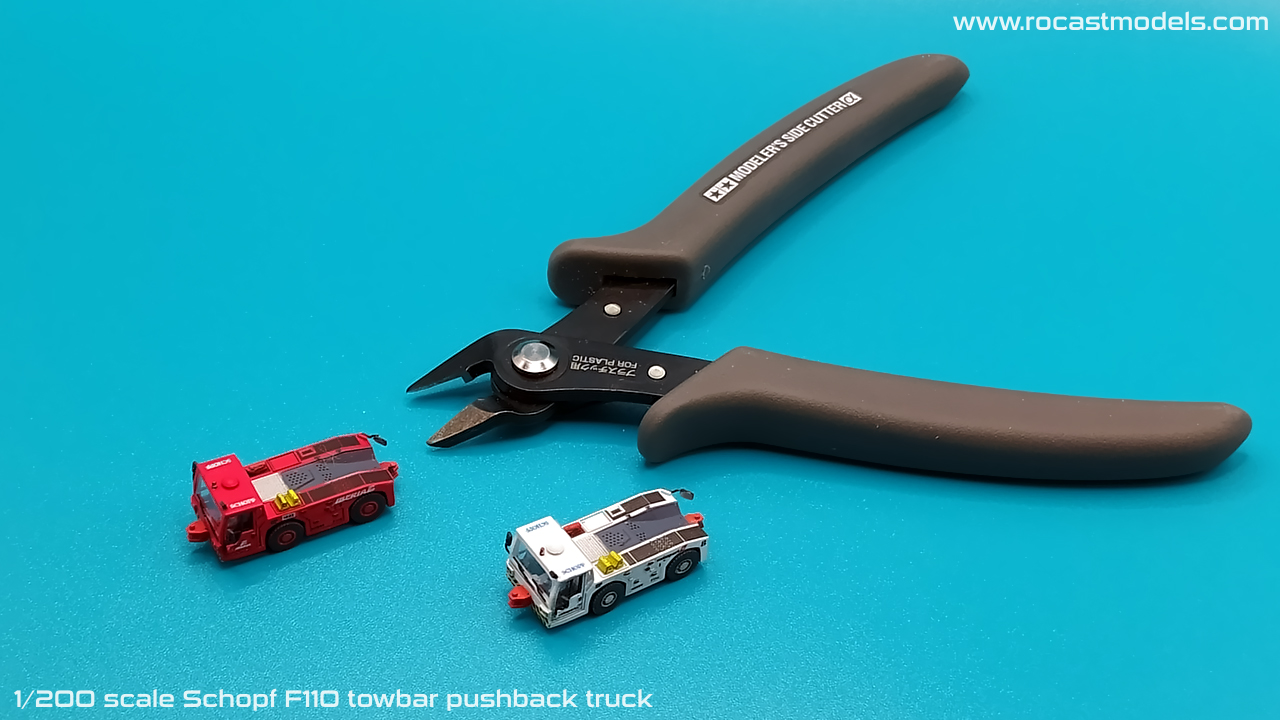
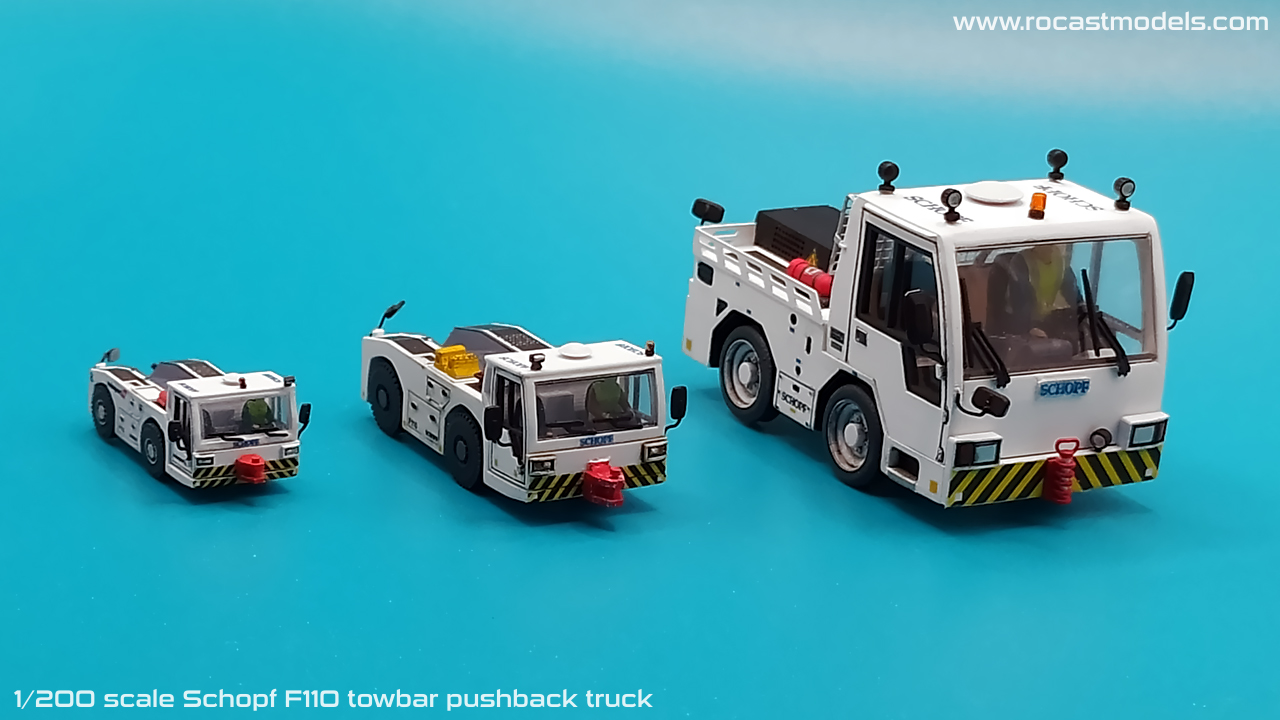
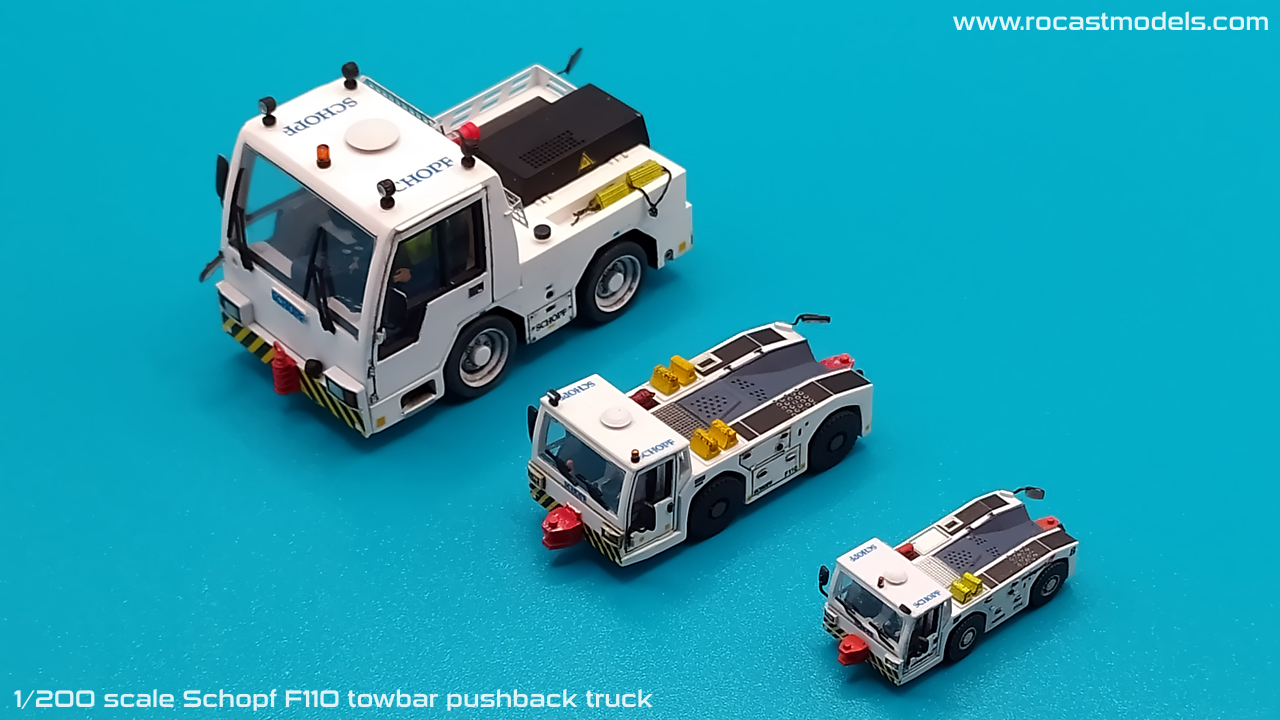
- Schopf F110 in 1/200 scale:
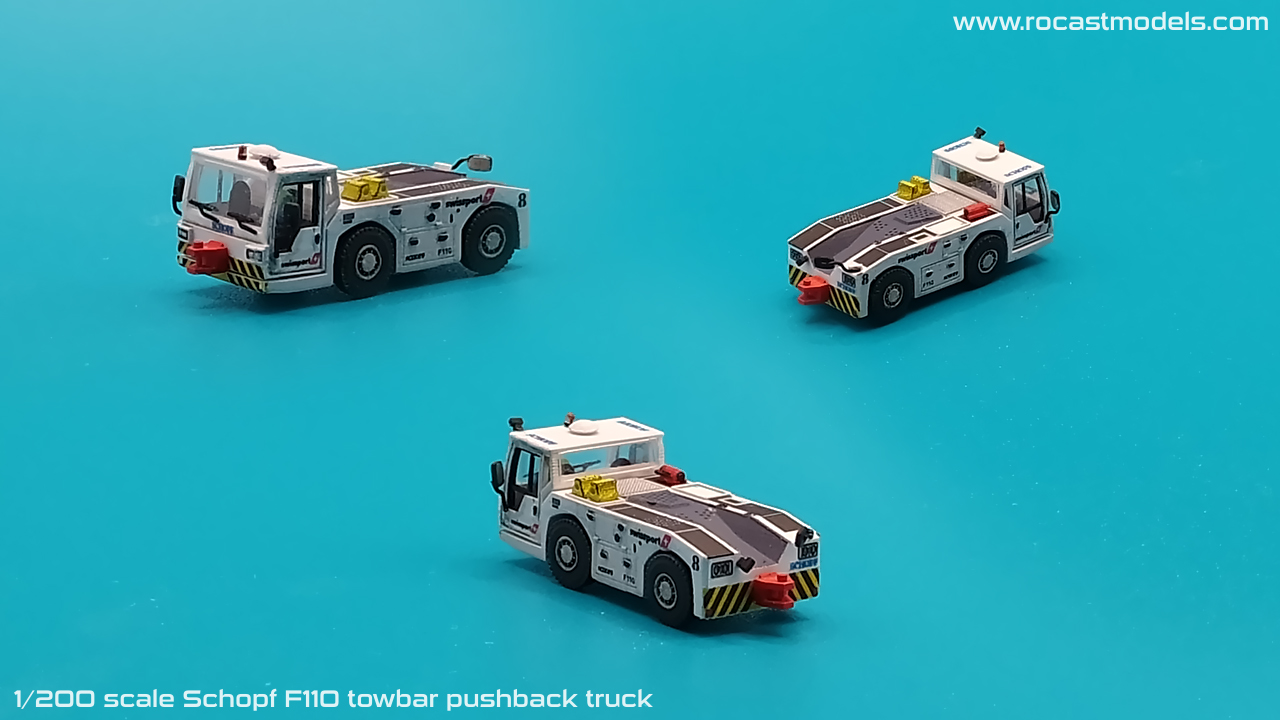
I have been asked about the 1/200 GSE models, which is a scale that takes me back to my beginnings and I am happy to finally share a bit of this scale. This model was quite difficult to build because of its size, very small. It is hard for me to photograph it in a way so that you can see how small it really is, but believe me, it is quite small, yet that is what the scale demands.
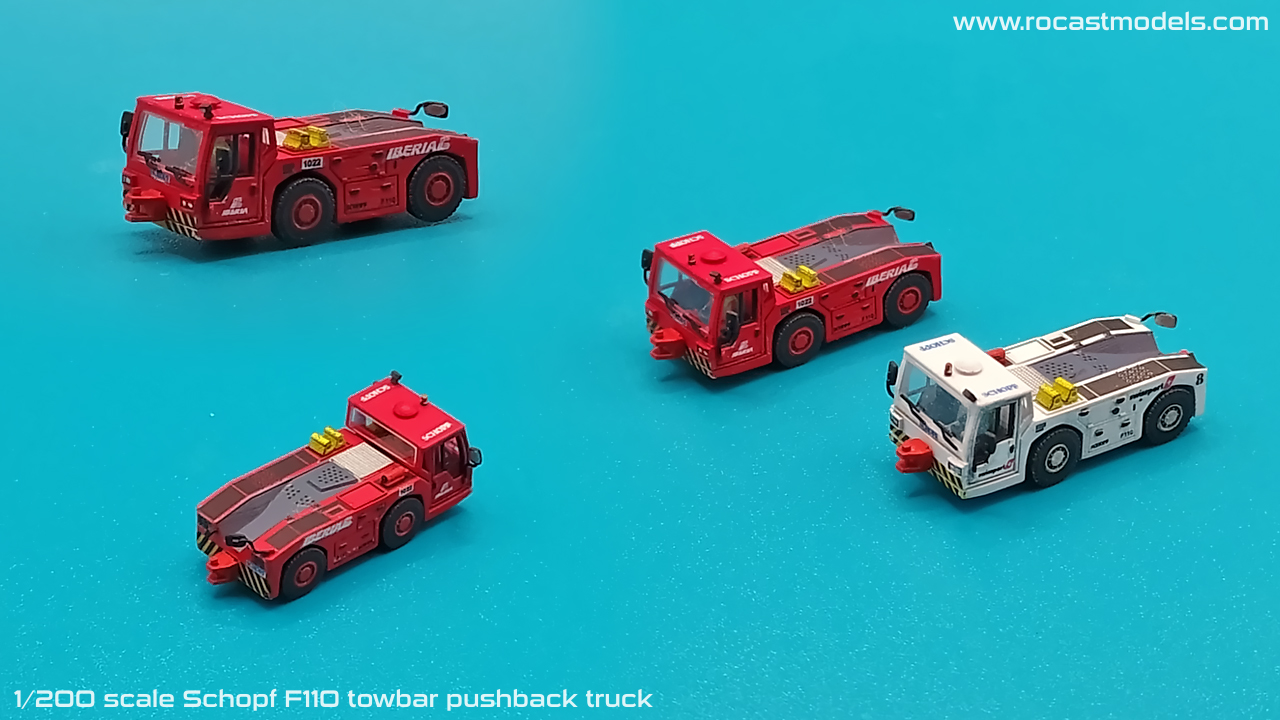
I want to be able to set a 1/200 scale category at the shop, but these models in particular will be sold already built by me.
During the building process I was really wondering if it was really worth it. There is a lot of time invested and some people may say “that is too expensive”, but one has to realize the amount of work that it takes not just to produce it, but also to assemble it.
I believe that if I do like chain work, it can be easier because the work can be better organized, but that does not save me from having to paint 10 little driver figures if I build 10 at a time.
I am excited about it though, so now that I build those example models, I have to look at times, preparations and a special packaging because it is different shipping a complete model than their packaged parts.
Also, I may give an option to the customer to have his/her model in a specific color/livery.
Here is the full family, 1/200 scale, 1/144 scale and 1/72 scale:
- Scenery items:
During my “break” I have been working on a couple of new items, because I am trying to make scenery assets in the future so that a full detailed ramp could be built. This would be a completely different series, and I really have big plans for it, as you know, the aircraft needed GSE, and now this combo needs a proper detailed scene.
So this item has been created in mind to help my friend Frank with his project, so I had the idea of making the so-called “Solid State Ground Power Units”.
I won’t get too much into describing what is this thing in real life, as this I plan to do once I present this item at the shop in the future, but I was inspired by those double solid states GPU seen at Amsterdam Schiphol which are actually a custom build from AXA Power for the specific airport.
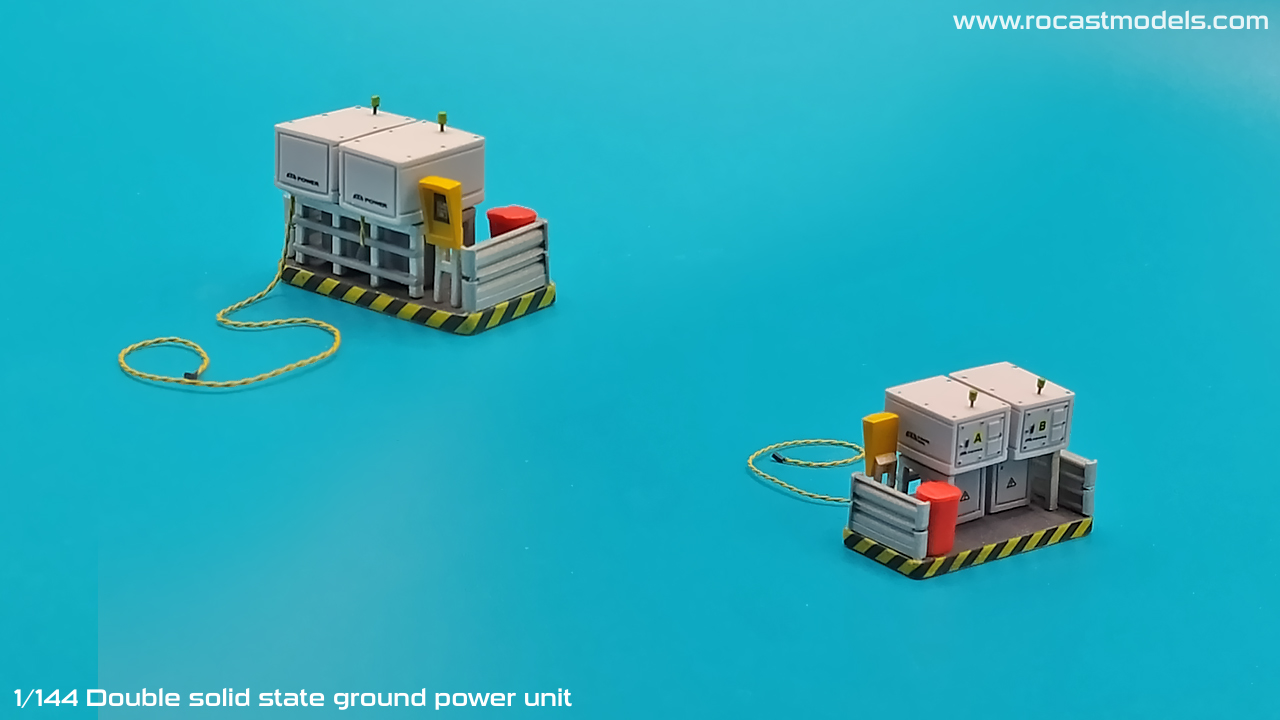
There is going to be a single Solid State GPU made in the future but at first, I plan to release this double version as I finish the first units soon.
Another item I’ve been working on are this 3 meter concrete barriers which I think can be useful to separate certain parts of the airport:
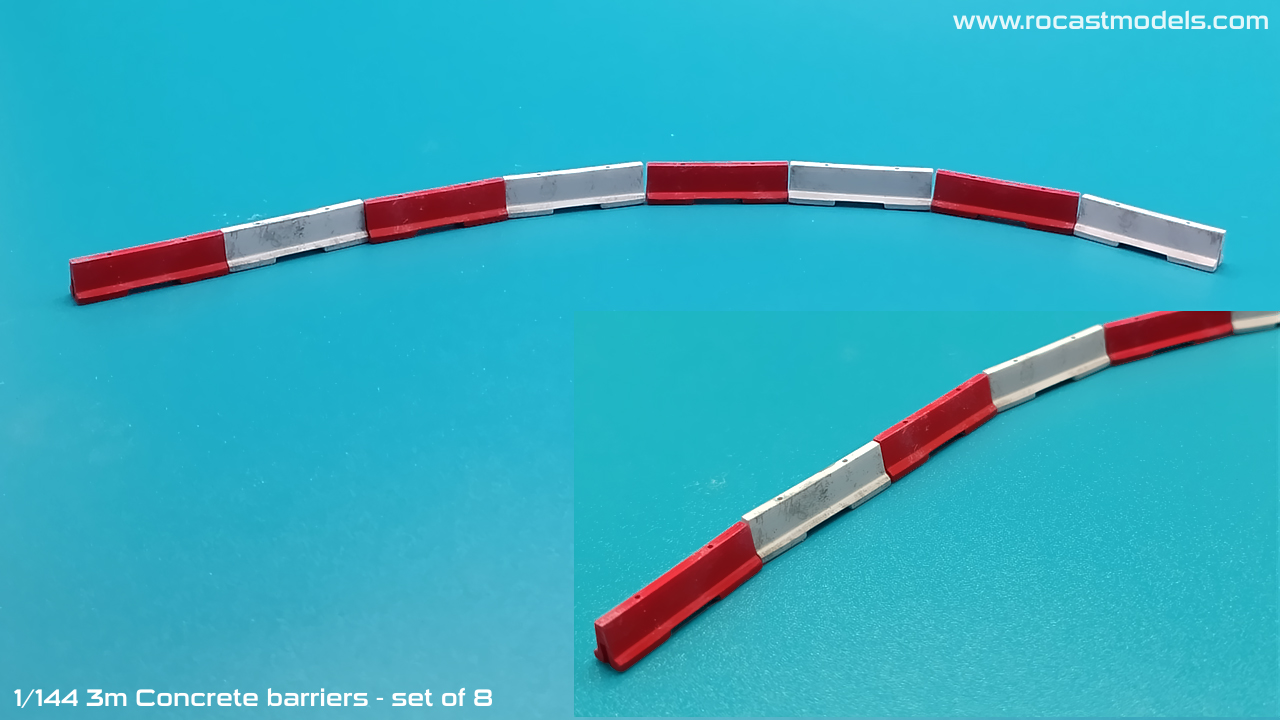
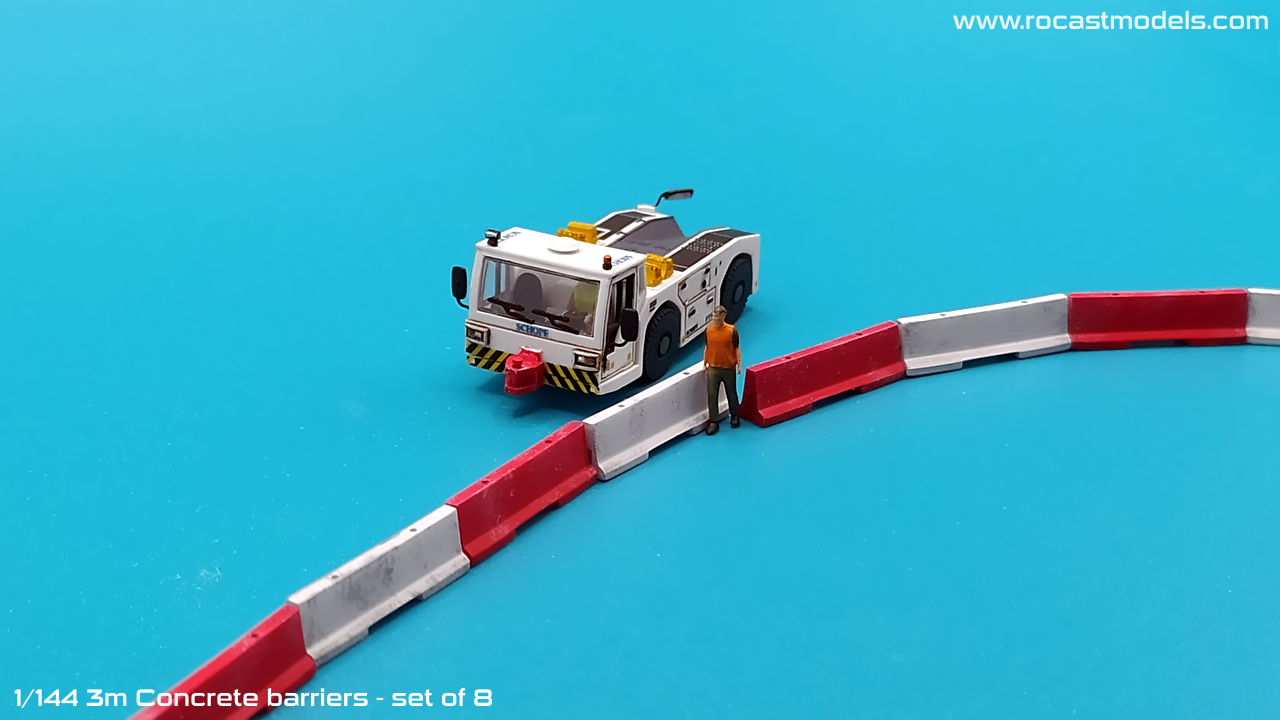
The set will include 8 “concrete” barriers.
- Change on the towbars:
Currently we are leaving behind the very hot temperatures of summer and I have to say I had to deal with certain things that this temperature change caused, from having to laminate the box covers (they were turning pink) to having to change a specific part for the towbars.
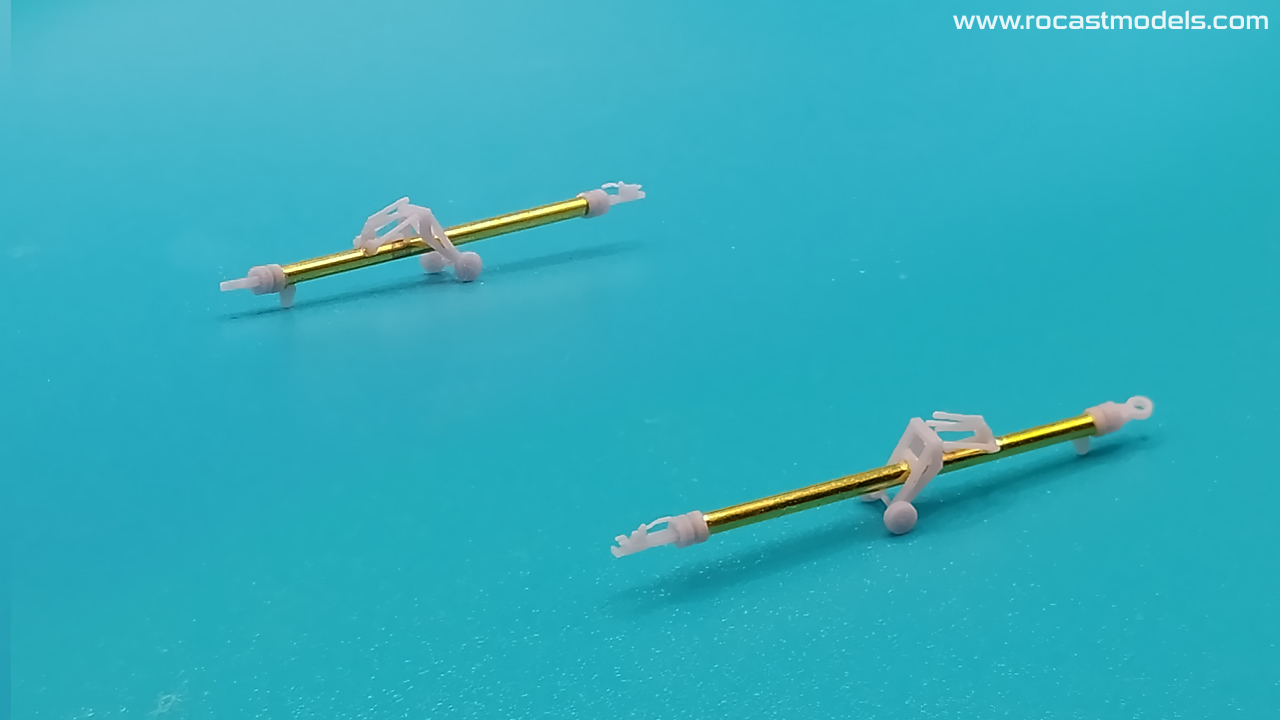
I decided to use brass for the main shaft of the towbar, this will simplify things for me in a way, but will also help me to produce these as they should, because making units of these was becoming not so great to the point to simply backorder them.
The rest of the towbar parts are exactly the same, only that the both ends had to be adapted to the brass tube, which is from the same size as the original resin shaft. I will add this update once the new photos are added to each product.
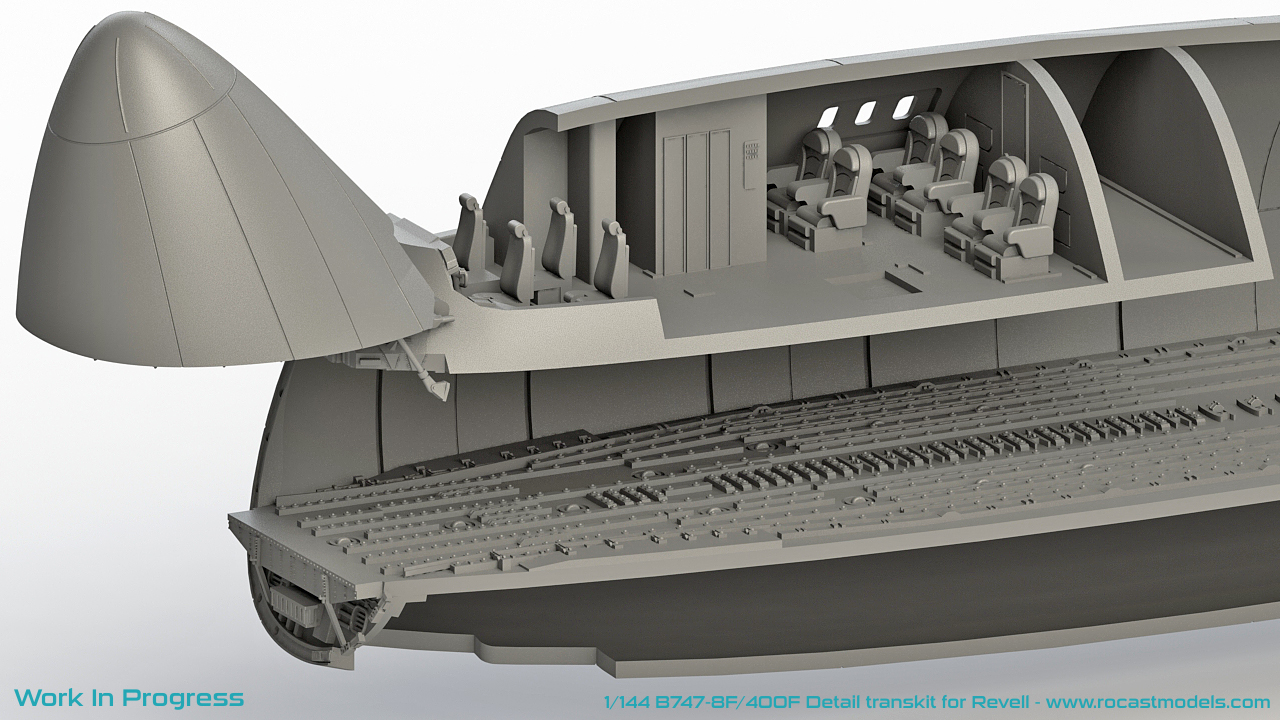
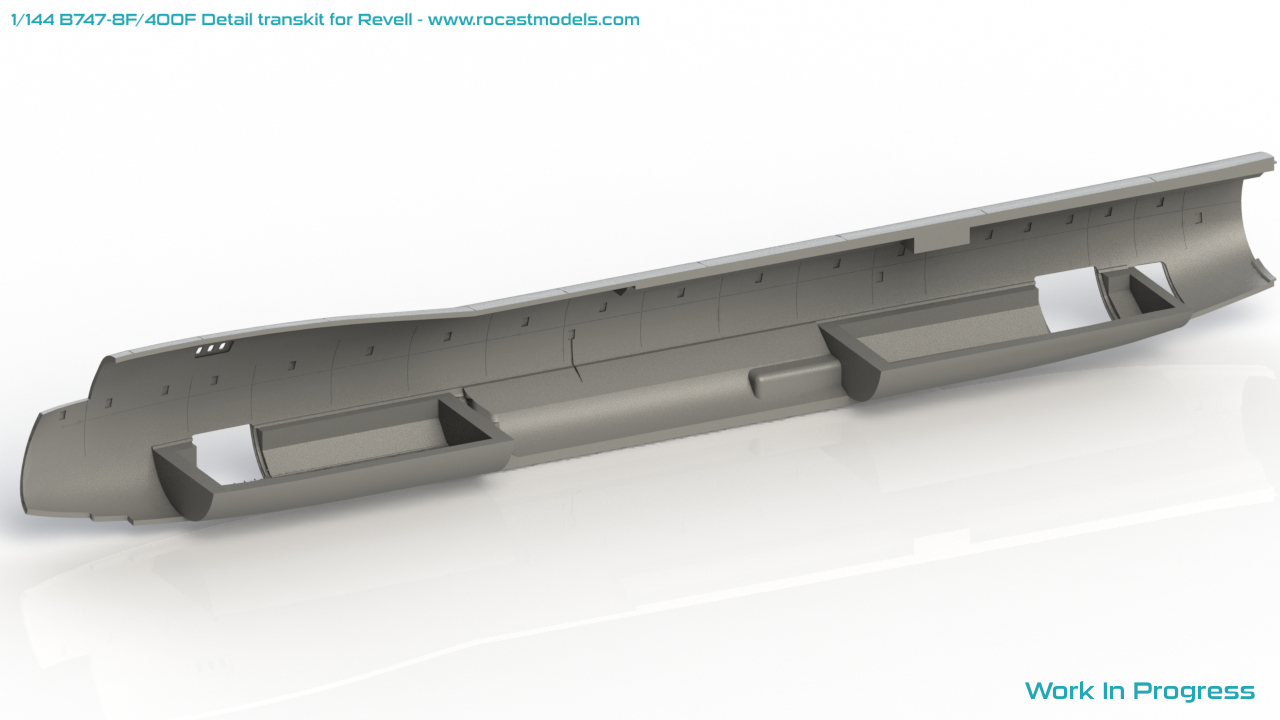
- B747-8F/-400F progress:
I have made a big step with this project. I am very happy to see that this is now a reality, when I started it, I wasn’t sure 100% if everything could be properly done, I just kept going, and now I can say that yes, it will definitely be completed.
At the beginning of the post, I mentioned an issue I had with my B737-700 build, and that is that I had a crack on the clear plastic for the cockpit windows. Fortunately, I had a spare and decided to duplicate it, taking a chance to try again the clear resin, the result you can see below:
Which one is the original plastic part from the kit? Well, it is obvious since my duplicated part is seen with the support attached to it.
The results were 100% successful. I had fears of the part not being rigid enough but it is actually an exact same duplicate even in strength from the original plastic part, high transparency thanks to this high quality clear resin which also includes an anti UV additive in it.
What does this mean for my projects? I will be able to make more complex things such as buses which have a larger window area, not to mention I will be able to make my own cockpit windows which will come in handy in the future…
But, for this 747, you can see how I plan to make this part from the photos below:
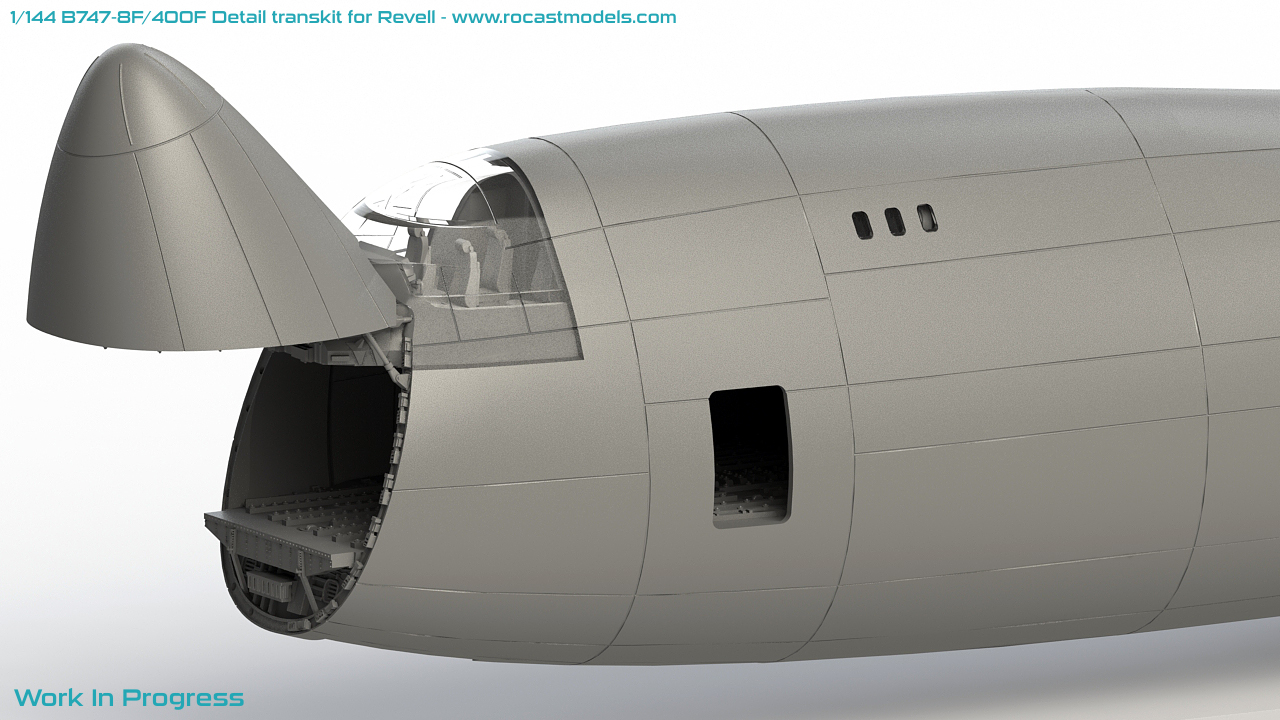
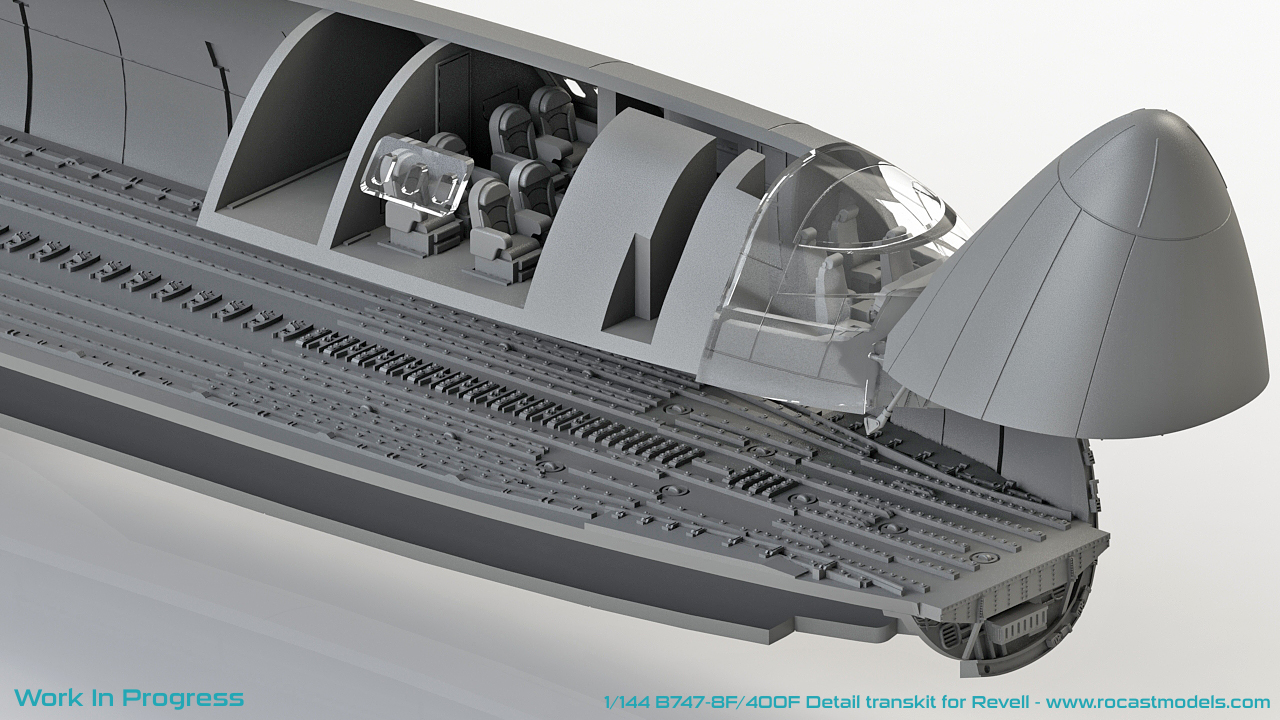
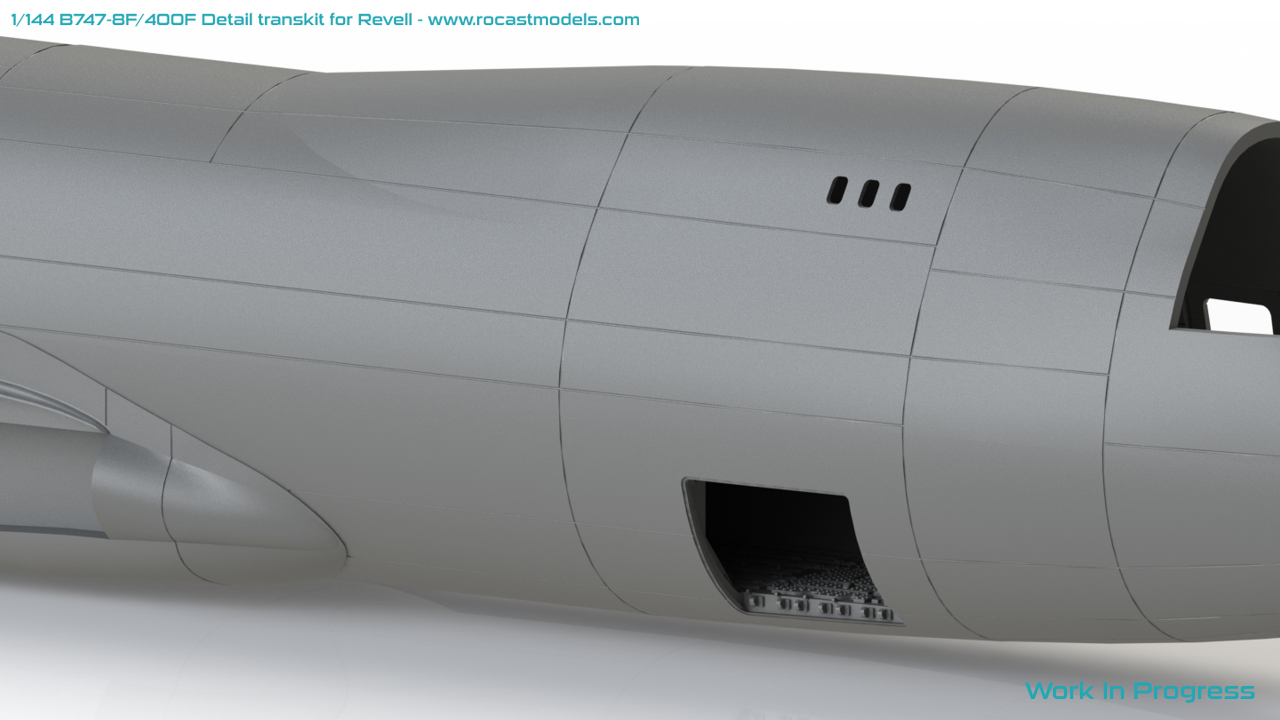
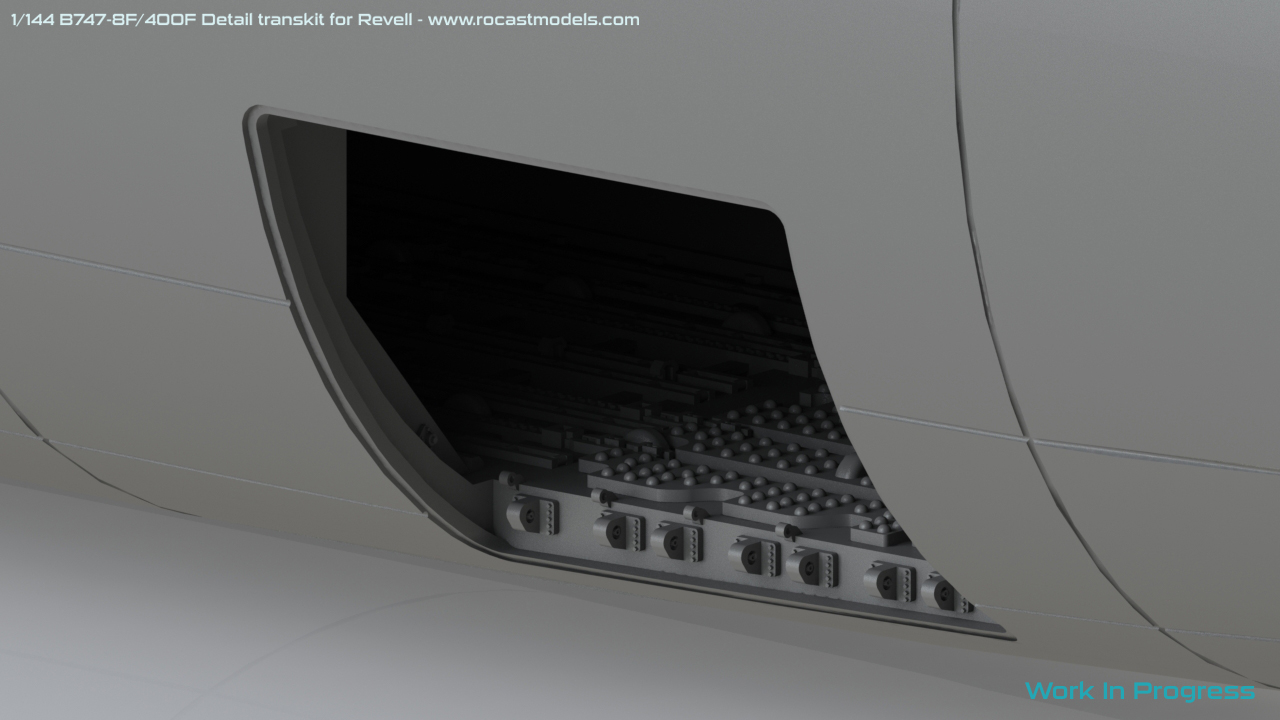
I have also opened the upper deck windows, and this time I was careful to keep the windows as thin as I could, since most of the plastic kits come with a very thick clear part which results in a “glass bottom” kind of effect once introduced in the window holes.
You can also see that I completed the cockpit as well as the crew area:
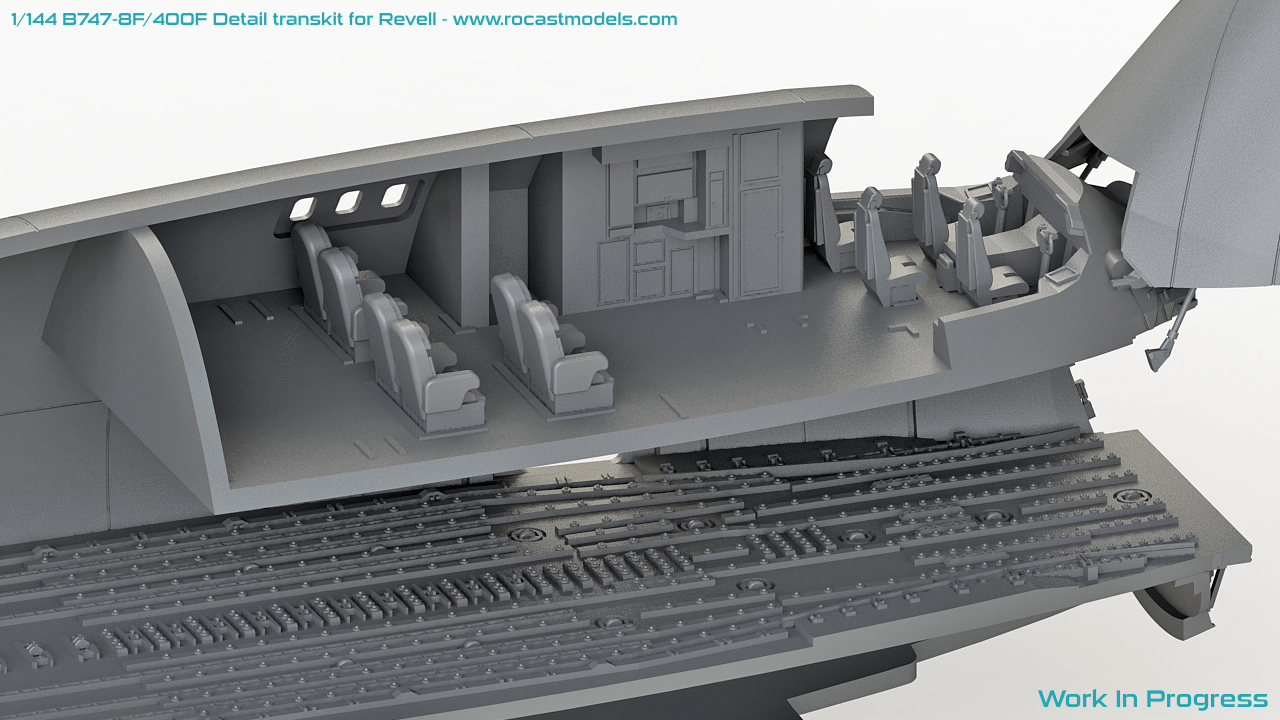
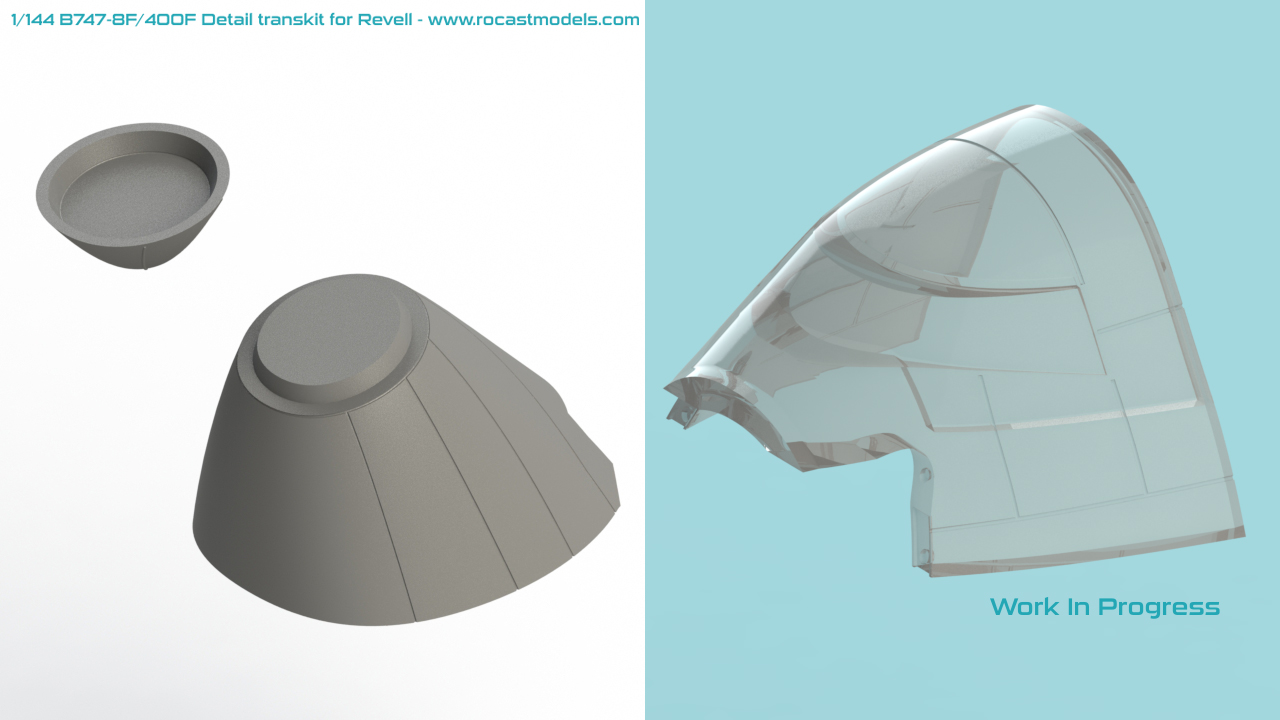
During the design process, I also have to keep in mind how the parts will join with each other, so I thought about this for the nose for casting purposes:
The next renders show the work I have been doing lately. There is very important news and that is that I have managed to reduce the 40 optic fiber wires to just four. There is not going to be a need to connect a wire to every single light place, but the same wire will take care of all.
I do not want to get too much into detail about this, but the test that I’ve done worked nicely, the light for the crew/cockpit and cargo holds will also be done in a similar way and the kit will include all needed for this purpose.
This new change of plans has made me fill back the different “routes” that I set for each light point.

Although I said that I would not be making the bulk cargo, I just decided that since everything was to be open, why leave the bulk closed? It will also be open.
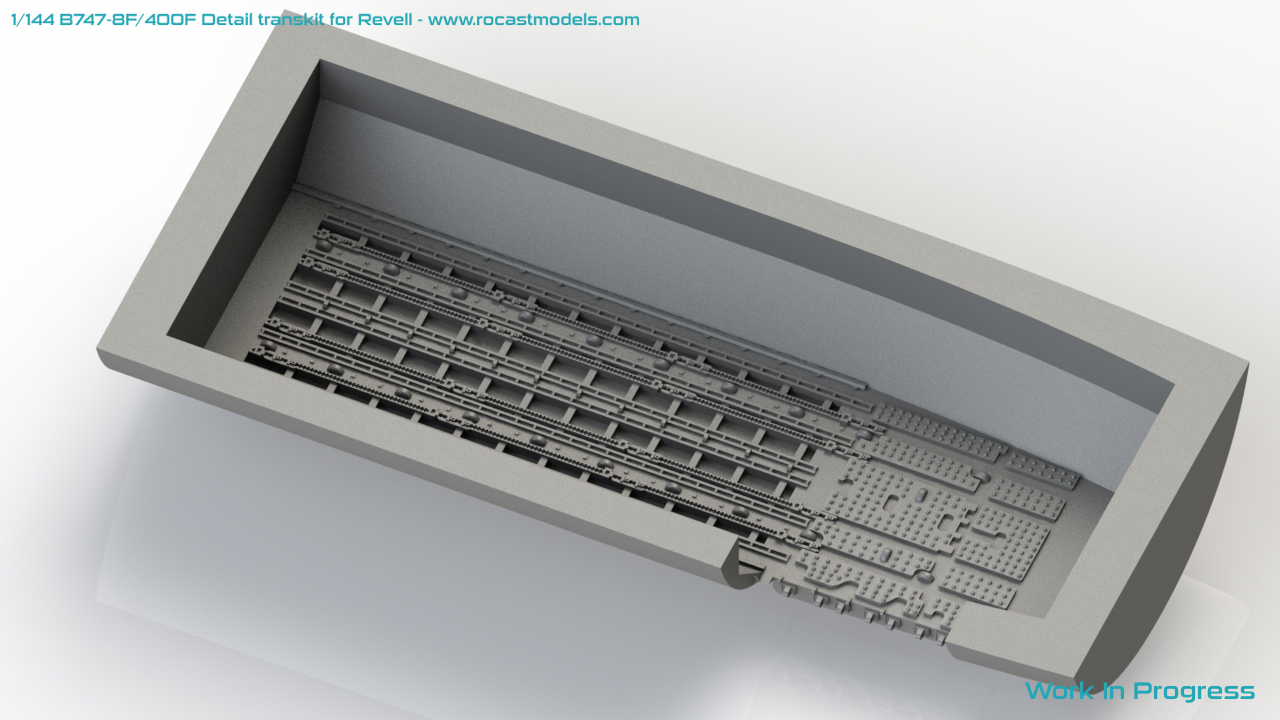
There is still quite a lot of work to do, but I am on my way. I have found some difficulties with the cargo holds, but I will explain them later in a dedicated entry since this one is getting too long.
I have learned a lot with this model, and this has given me the possibility to do more freighter stuff in the near future, being those at first, the B767F and B777F. These are not going to have a different fuselage at first, but making the fuselage on this B747 has given me a lot more knowledge that I will surely be putting into practice again on a project next year.
- B737 cockpit 1/12 scale:
Unfortunately I haven’t been able to advance much with this, as you can see, there has been a lot of work going on, and to be fairly honest, I need certain items which are medium/short-term projects to keep things running. At the end of the day, everything costs money, material isn’t cheap, I don’t just use “3D printing resin”, I use polyurethane resin, silicone, acid, metal, decal material etc, and although prices of things rises, I maintain mines and that is what I plan to keep doing.
I hope, however, that these new items can do well, because I want to purchase other equipment as soon as I can since I specially need it for the master parts of the B747 cargo project. Technology is advancing quickly, and there are certain things that certain equipment is better on a specific feature that I need, so my plan is to purchase a new one for practice while making the master parts of the B747 cargo and then replace the rest of the printers.
I am aware of the lack and in some cases short stock at the store, so now that I’ve finished those example models, I am going to make new units again, also, since the temperatures are now better, I will finally be able to produce sharklets again.
In part 2 I will be writing and sharing with you the new baggage carts as well as give release date for these new items.
For me, it has been weeks of exhausting work, then during the last two to make 6 trucks at the same time all in different scales, yet I am still working on a Pulsar 7D in a 1/87 scale which was another request, so hopefully in my next update I can share this transporter with you.
That is all for now, I promise my next update will not take that long.
Best wishes,
Guillem